Sunday, January 2, 2011

AAQ link

A couple of years ago I made a small quilt for the Alliance for the American Quilt, AAQ, is a nonprofit organization "established in 1993 whose mission is to document, preserve, and share our American quilt heritage by collecting the rich stories that historic and contemporary quilts, and their makers, tell about our nation's diverse peoples and their communities" (http://www.allianceforamericanquilts.org/about/).  The quilts for this fundraiser first appeared at Quilt Festival in Houston then were auctioned off on Ebay to raise money to support the efforts of the AAQ.  recent image


The challenge was relatively simple: make a 16 X 16 inch crazy quilt in any style or fabric and submit it by the deadline.  I had some beautiful fabrics and lace left over from a wedding dress project and from a baptismal gown.  I also had some vintage laces from my mom and grandmother that were beginning to yellow.  I laundered everthing in one wash and laid them out to dry, then made a quilt for the AAQ.  Adding some embroidery and a little beadwork finished off the quilt and in no time it was ready for shipping.  To see the quilt and others from the fundraiser, click on the title link below:


Special Occasion: Past and Present


I am grateful to the people and volunteers at AAQ who make it possible to document the quilts that people everywhere make and use as a matter of everyday life.  Without them, beautiful quilts would be lost forever, and the stories that go with them would fade away along with the beautiful people who make them.

Saturday, January 1, 2011

You Can Make This

As a writer, I've put together a few craft projects that have been published.  A website that I ran across a couple of years ago, YouCanMakeThis.com, which is an internet site, "where people [can] learn how to make items for their homes and families" according to their "About Us" page.  Owned and managed by twin sisters, Kim Christopherson and  Kris Thurgood, the site provides patterns and how to instructions from a variety of writers for crafters.


My experience with YCMT has been somewhat limited as I've not found much time for writing in the last few years.  I do have three e-books on the site which are for making a monogrammed pillow, drawstring purse, and a small dressy purse for special occasions.  To see these three patterns, click on the web address below:    Fleur de Lis Design Studio at YCMT


Etsy Feedback

I started gathering receipts, statements, invoices and so on to prepare to take to our bookkeeper in a few weeks.  As I was doing so, I ran across the feedback I've gotten since opening my Etsy shop in June.  I've been relatively lucky in that I've had opportunity to make items on commission and I had an international sale (see my post on 11/15/10).  I thought that you'd be interested in some of the feedback I've gotten.  There are a few more positive ones (no negatives, :-) but you get the idea.   Here are three notes I received as feedback in my Etsy shop from the last few months:


Handmade Quilted Garment Bag, 20 x 54 x 3


QUILTED GARMENT BAG
"I've looked for this style bag everywhere and had no luck. I'm glad now that I didn't find it until seeing Mary's work. It's a gorgeous fabric combination with great attention to detail and skillful sewing. Time for a ROAD TRIP!! Thanks, Mary!"
                                from bat2 
RESERVED FOR Marilyn -- Personally Me mini-wallet


PERSONALLY ME MINI WALLET
What a cute set Mary designed for me! Everything is so well made and professional looking that I will be proud to give this as a little thank-you gift to a friend who did a favor for me. Keep the great products coming, Mary!
                              from Marilyn


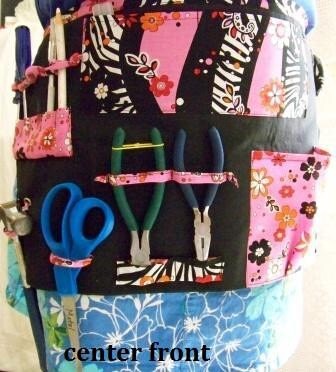
CRAFTER'S TOOLBELT  (custom order)
Mary really delivered on this one! I explained to her in a phone call an idea I had in mind for this tool belt. She understood my craziness and designed a crafter's tool belt that is super-reinforced and has a place for everything. And--as an added bonus--she had it designed and made in less than a week! TOTALLY AWESOME...
                               from mdoucet


Thursday, December 30, 2010

Done: Winter Doldrums Undone

So, finally! the current quilt is done.  Finished it this morning.  Although there are quite a few errors on the quilt, I like it.  I probably won't raw-edge applique again since my hand is not steady enough to stitch down the qpplique on the long-arm.  But, it was a fun quilt to make and I learned quite a few things that I can apply to future quilts.  Enjoy the photos.

Most of the quilt laid out on the floor of my living room.

Left side to show applique

Right side showing most of qpplique

Upper right--just a few flowers floating to top

Upper left--note there's more applique on this side.


Close up to show applique, esp. the feathers

Quilted flowers with tendrils or vines

Stippling on borders

Appliques in Place

And so, once I found several flower appliques that I liked, I began adding them to the border that I had prepped the day before by sewing down a couple of stems.  I like the look of an asymmetrical border that has a sense of balance.  To achieve this balanced asymmetry, I first sew in somewhat balanced flower stems.  For this quilt I started by finding the center of the bottom border and the center of the longest stem--I had decided to use three, one long one on the bottom and one on each side.  I loosely placed the long stem curving up and down along the middle of the border and then curving around the corner and up the sides.  I then added the two shorter stems intertwining them with the first one.

I began adding the flowers on the bottom border and worked my way around the bottom and up the sides.  To insure that I had flowers on both sides of the center, I separated flowers into two groups.  I also tried to include flowers of different sizes near each other so that they would look more realistic.  The result is a vine that is not the exact same on each side but is clearly connected.  I prefer the look of flowers in nature rather than in formal flower beds--although those are beautiful.  The large single flower in the center that falls more on the blocks rather than on the border is a reminded me of a corn plant and although it intrudes somewhat, I like that it breaks up the monotony of the blocks and in one or two instances allowed flowers to "fall" out of the border and onto the blocks. As you can see from the photos, the quilt is loaded onto the long arm machine and ready for quilting.


Once the flowers were all placed and ironed downed, I was ready to begin quilting.  I loaded the quilt onto the long-arm and played with several ideas for quilting.

Monday, December 27, 2010

After-Christmas Energy

Here's hoping that everyone had a wonderful Christmas and that you got the things you were hoping for.  I really enjoyed our time with the boys and their families.  All three of our sons, their wives, and their children joined us and my dad for lunch at our house.  Then we loaded up the kids and lots of food and went over to my in-laws to have a meal with them and their whole family.  It was a bit too busy and crowded but it was wonderful to have the whole family together under one roof for a few hours of laughing, eating, and gift-giving.

I spent much of Christmas Eve in the studio since there were few preparations to worry about for Christmas.  All the gifts were wrapped, the food prepped and ready to go, and the house decorated just enough to give a true sense of Christmas without having to work for days and weeks.  I don't mind decorating, it's the clean-up that gets me, so we decorate without going overboard so that putting away decorations is doable.  Now, to find someone to do it!

I love to build quilts that have piecing in the center and a wide border with applique on the edges.  This gives me the best of both worlds: the speed and ease of piecing and the beauty and creativity of applique.  I decided to do the same on the Disappearing Four Patch quilt that I've been working on.  This combination of piecing and applique is becoming my signature for large quilts.  I tried playing with my Accuquilt Studio Cutter and realized that there are numerous possibilities when I begin with a circle shape then cut it down into various parts for different flowers.  To show you what I mean, I've taken a few photos of my process.


The beginnings of a flower--can you see it?
 For this first photo, I started with a circle, then cut it down twice by moving the pieces around on the cutter and running it through the machine again.  For this shape, I began with six layers of fabric and kept them together through every step of the process.  That way the changes happened to all six pieces at the same time, and I came out with the same exact shape on every one.  I simply spread them out in a circle so that the points were touching at approximately the same place.  The shapes become the petals of one flower.  By removing one petal, I ended up with a starfish shape, but I like the flower shape.  Add leaves, a vine and a yellow pistil and we'd have a pretty good applique.  

Now, if you try this, don't throw away the pieces that are taken off when you run them through a second or third time.  Those pieces are perfect for forming other flowers.  I played with the castoffs from several attempts and discovered that thinking outside the box works.  These hollyhocks were made strictly from castoffs.  I added the stem so that you can envision the flowers a little easier.

Cute hollyhocks, gonna have to play with this.


Before I got the hollyhocks, I tried to form flowers for some time.  Some attempts worked, others didn't.  It's a matter of playing and seeing a design as you work through the process.


I started out playing with a cheap purple fabric that I happened to have on hand.  I figured that if I tossed everything, it wouldn't be a huge loss.  But the more I played and liked what I came up with, the more I wanted to try other things.  I decided to add some yellow to see if that one color could make some of the not-so-great flowers work.

Just getting shapes on fabric.  Not a lot here, but still at the beginning of the process.

 Yellow makes a big difference.  Some things that I would not have tried on the quilt, like the small circle shape on the bottom of this photo, found its way once I added the yellow.  Why, or how, do I make the decisions, I honestly can't say.  I tried different things and liked some.  Others I wasn't crazy about but tried not to let that get me down.  Instead, I snapped a photo and moved on.
Using two or more shapes to form one flower.

The same shape repeated.
 After a while of playing, I began auditioning the shapes I liked using different colors and adding leaves, stems, and stamens.  When I liked the outcome, I found a place on the quilt for it.  At first I simply pinned the flowers down, but that became time consuming and it was difficult to move the quilt and keep the flower shapes stable unless I added lots of pins.  After a while, I got brave and pressed the flowers in place.  The iron-on adhesive is fairly permanent, removing the shapes leaves a residue on the quilt and destroys the flower shapes, so I had to be sure that I wanted the flower in a chosen spot before pressing.  Eventually, I got very brave and pressed as I added flowers to the border.  Patience is not my strong suit!

Some of the "I'm not crazy about these" shapes appear below.  Don't spend much time looking at them, they are pretty horrible, but part of the process means editing out what doesn't work.


Reminded me too much of a swastika.

I tried but the shape isn't any better with some added elements...no way!
This could work for a tulip, but it didn't make the cut anyway.

Yucky, is this a person?


And we'll leave it at this for now.  Every creative idea takes time and energy.  As creative people, we have to play and try different things to figure out what works and what doesn't.  The key is to keep trying and to take notes in some form (photos, writing, journals, sketches, etc.) so that when we come back to the process, we can replicate the good work we've done and avoid the work we aren't so crazy about.

Monday, December 20, 2010

Disappearing Four-Patch Tutorial

When I purchased a charm pack of 10 inch squares of batiks, I put it aside in the hopes that I'd find something to do with it.  That was at the beginning of the summer, which I spent mostly helping my dad to care for my mom since she had cancer.  I didn't have much time to think about quilting, although I did manage to get into the studio on occasion.  It made for a great stress reliever.  

Then suddenly I had plenty of time for quilting.  Although we knew she was terminal and her time was short, I really believed that mom would last through the holidays.  She passed away on November 2, and I didn't know what to do with myself since I had a difficult time focusing on any one project.  I finally decided over the Thanksgiving holidays that I would have to get a handle on my depression.  So I finished a quilt I had loaded on the longarm and began looking for a new project.  I found the tutorial for a disappearing four-patch on the Quilting Board and decided it would be perfect for the pack of batiks.  Rich and I went to Borne Quilter and I picked up a few yards of a neutral batik that would calm the colors and patterns down.  I've working on it fairly regularly since.  Yesterday I decided to take a few pictures and post them in a tutorial-style essay.  And here goes....

Start with any size squares--mine are 10 inch squares--just make sure that all the squares are exactly the same size.  It also helps if they are rather large, I think at least 6 or 8 inches because they will be cut down.  They should, of course, be cut on grain since they will be more stable.  

If using a neutral, which I recommend, stitch a neutral to a color using a 1/4 inch seam allowance and press.  I did all these in one run of chain piecing (do not cut the threads, instead add the next block and keep going).  Then stitch each two-patch to another two-patch to form a 4-patch.  

 Again I chain-pieced the two patches together in one run.  Just make sure that when putting the patches together you

  • put them right sides together
  • have the neutral touching the color
  • lock the seams (the seam allowances are going in different directions)
  • use a 1/4 inch seam allowance

Once you've stitched all of your four-patches (4p), you're ready to begin cutting.  You will make four cuts--two in each direction.  Since I was using 10 inch squares, I had a large 4p.  I decided to cut my 4p 3 1/2 inches from the center seam.  The 1/2 inch would leave me enough for 1/4 seams, the three inches would divide the 4p so that I'd get different sized squares.  This adds interest and adds to the look of a complicated block.

Now decide how you want to arrange your new block.  Watch as the 4p disappears into what looks like a very complicated block.  Here are two arrangements:
With all the colors still close together and a diagonal feel to the new block.
 This is the one I decided to go with.

With the colors all across the new block.  This one has a sort of X going for it.  


Treat your new block like a nine patch.  Sew the blocks into rows then sew the rows together.


 Keep going, make more blocks and before you know it you'll have enough for a quilt!
Now you get to make more design decisions--how will you arrange the finished blocks?  I'm putting mine into rows of four across and five down.  This will give me enough for a center.  I'll use more of the neutral for a wide border so that I can add some appliqued flowers--my signature quilts generally have a center of pieced blocks surrounded by flowers.

Here are a couple of arrangements I've played with on the design wall:
Trying to put colors together, but it won't work since I didn't pre-plan that.  Sure looks good, though.

With all the blocks facing the exact same way.  Adds a more scrappy feel to the quilt.

I will use the first one, but there's bound to be others available.  I've just already chosen a quilting motif that will look best if the colors are touching and the neutrals are also touching.  I also like the result of the small squares encircling the larger squares.  Gotta get more blocks sewn so I can get to that quilting motif!  Happy quilting!