Showing posts with label directions. Show all posts

Saturday, January 27, 2018

Sunday Quilt Inspiration: Easy Squares

Patchwork Quilt Quilted Blanket Traditional Quilt by PeppersAtticWay back in 2013, when I started this series, I wrote about making quilts from simple squares. You can find that very popular post here. But it's been a while and I've discovered many more quilts made of squares, so I thought it would be nice to revisit the idea. I won't go through the directions of how to make a quilt like this; you can easily go back and read that.

Instead, I thought I'd give you a few reasons for making a quilt using one square blocks. 

  1. they are easy to sew together
  2. you can use coordinating fabrics 
  3. you can burn through a pile of scraps
  4. no difficult circles to sew 
  5. matching corners is relatively easy
  6. any edge can be the top (so you can choose your favorite)
  7. any size block will work (so big blocks make for a fast quilt)
  8. using blocks of different colors, you can create a design (without difficult blocks)
  9. it's easy to move up to other shapes (rectangles and triangles are easy next steps)
  10. it's easy to move to two- and three-square blocks

Funky Random Patchwork Quiltpicnic/double by secondsanctuary

.


HUOT, share, promote, share the love :) by renee leary on EtsyPink vintage sheet quilt - The Vintage Sheet Blog

Absolutely gorgeous!! by Bobo Bun

My quilt | Flickr - Photo Sharing!Rainbow Quilt by Rae | Flickr - Photo Sharing!


It's simply 12" squares - nothing complicated. I just needed something that would come together fast and easy. I picked out all the springy and bright fabrics. It measures approximately 92x92".

Sunday Afternoon Quilt - Two Brown Birds- Creative Card PatternSECONDARY_SECTION$6.00: Fabric Patch: Patchwork Quilting fabrics, Moda fabric, Quilt Supplies,�Patterns

Sunday, October 8, 2017

Sunday Quilt Inspiration: The Power of THR3E

It's true, three has some pretty special powers that no other number has in quite the same way. There's the most obvious, the Trinity: Father, Son and Holy Spirit. Can't be a Christian without knowing the power of this particular Three.

Types of Triangles | SchoolTutoring.com

But three is a cool number anyway. How about the three sides of a shape? That's what we'll deal with today. There's the triangle, which is the only (equilateral) real triangle. It's the only one I ever really remember because I finally made a neumonic for myself: equi means equal, and lateral means side. So equal sides is what makes a triangle. [Someone could have told me that 45 years ago!]  

Colleen-Flannel-Triangles-Quilt.jpg 533×800 pixels
But there are also right triangles. And acute triangles. Obtuse triangles. Isosceles. Scalene. I imagine that there are triangles for any way you can think of drawing a triangle. So, as long as there are only three sides, you've got something in the way of a triangle.

Since we're into quilt-making, let's consider how to make a quilt with triangles. They don't have to be equilateral to work, but for this SQI, we're looking at real triangles. By the way, half-square triangles or HSTs, are right triangles, not equilateral triangles. Try not to get confused here.

Triangles and More Triangles ~ A Finished Quilt
Equilateral triangles quilt
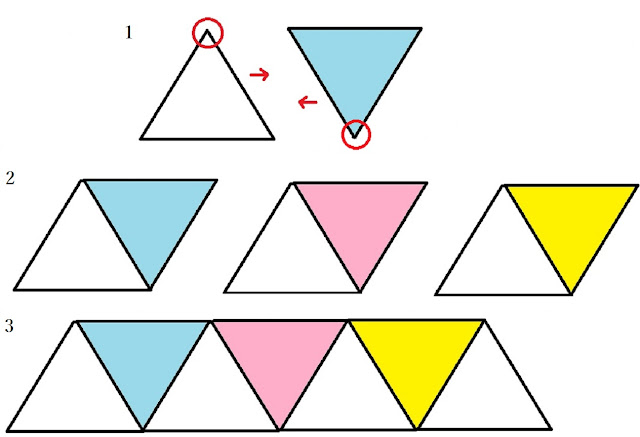
1.  Start with a set of equilateral triangle pieces of fabric that are the same size. (This is a great time to use that Accuquilt.) I like to sew in strip sets, one right after the next. To keep things easy, I'm showing white triangles separated by colored ones. That is so you can see that I'm keep all the white tris facing me with the point up. The colored tris match to the white ones (RST) with the point down. See #1 in the diagram.


2. Continue sewing pairs in this way until you have what may be enough for a row. 

equilateral triangle quilt tutorial
Trimming the side to
square up the quilt
3. Sew the pairs to each other to create a row. Make several rows.  If you have a square quilt in mind (equal length and width) count the triangles in the first row and make that many rows. Let's say 12 triangles will make a 36" row. You'll need to make 12 rows to get a 36" x 36" quilt. 

But you're working with triangles, so the sides will not be straight until you cut off the protruding triangles. I recommend that you sew one extra pair to every row. Now you'll sew 14 triangles to make your 36" row because you'll be straightening the sides out later. 

Once you have enough rows to make your quilt, you'll want to put them on a design wall or some place where you can play. There are too many designs to show them all here, but you probably get the idea that this is the playing step.


Now that you've decided on a design, sew two rows together matching the points for that design. Keep going until all the rows are in place. Really, it's that simple. 

I sometimes forget how a simple triangle quilt can be something really special.  Reference this for future quilt.

block M quilts: Porcupine Playground triangle quilt


The Scrap Basket :: Equilateral Triangle Quilts                                                                                                                                                      MoreQuilt it: flimsy.  Love this soothing 60 degree triangle quilt!

7 Equilateral Triangle Quilts to Inspire! {plus a pillow} — SewCanShe | Free Daily Sewing Tutorials

Like challenges? Here are a few that might tax your thinking...

Sew with equilateral triangles in this fun, modern quilt pattern. Cut triangles with a standard acrylic ruler or provided template. 68" x 78" Kit includes: 7 1/8 yards of fabric for top and binding -

Triangle star quilt block tutorial - Diary of a Quilter - a quilt blog

Modern Triangle Quilts: 70 Graphic Triangle Blocks * 11 Bold Samplers by Rebecca Bryan

Modern Triangle Quilts: 70 Graphic Triangle Blocks * 11 Bold Samplers by Rebecca Bryan

Modern Triangle Quilts: 70 Graphic Triangle Blocks * 11 Bold Samplers by Rebecca Bryan

Monday, June 9, 2014

Louisiana License Plate Patterns

I am finally finished working on patterns for the AMB license plate!  I am so very sorry about not getting to them last week as I had hoped to do.  I guess playing in New Orleans had an adverse effect and scorched my brain.  Regardless, I have patterns.
  

Now why the paper looks pink or beige, I do not know; so more apologies all around.  I was able to clean it up even more and will post a PDF file so that you don't have to print this version.  For now, though, we'll have to be satisfied.  I've sent an email to Zoey and asked for help in making the pdf downloadable since I don't quite know how to do that.  As soon as we figure it out, I'll let you know.  You can email me at mary.marcotte@gmail.com and I'll send you the pdf version.  

city scene and crawfish page 1

In the meantime, you should know that I simply cut and placed the pieces onto background fabric, pinning them down. I tend to work in an organic fashion: cutting by hand without a pattern and used the completed license plate to draw my pattern pieces 

The fabric color and number are on the pattern pieces just under the name of the item. On page 2 "tt" means tree tops and "lp" means lily pads.  Those pieces are so small that I didn't have room to write the whole thing.

swamp scene page 2
I did use fusible web on a few pattern pieces, but I tend to work without the fusible most of the time.  You may want to use fusible on the smaller pieces: draw the pattern on the paper side of the fusible, then apply the fusible web to the back of the fabric and cut out on the lines.  Peel the paper backing off and place your pieces where you'd like them. 


You can use my license plate as a guide, but I suggest that you play with the design and move things around so that you're pleased with the end result.  I pinned the whole block to a heavy interfacing--I used Ricky Tims' Stable Stuff, but others will work.  If your interfacing is not heavy enough, the fabric will pull together and bunch up.  Add another layer of interfacing or change to a heavier one.   

I have layered my entire quilt so that the batting acts as another interfacing, and this works especially well when thread painting.  I didn't have that option for this project, but you may.  If so, I recommend that you consider it.  

Once all the pieces are in place, press or take the block to your sewing machine and stitch down the pieces, threading painting as you go.  I like to put down at least a few stitches on every pattern piece to help hold them in place.  Then just have fun.  Feel free to change threads and add color to your liking.  Louisiana is diverse, if nothing else, and the people who fell in love with Blue Dog certainly will allow you some leeway in making your block your own.  So just have fun!


Did you notice the lines in the water?  Those are gator lines!  When alligators and other large creatures swim on the top of the water, they move the duck weed and the other stuff on the surface, leaving a trail of sorts behind them.  


The crawfish is perhaps the most difficult of all.  I cut it out in one piece of fabric with fusible web.  Pressed the crawfish in place and then stitched in the sections of his body.  He doesn't even have a face (I didn't want to deal with those buggy eyes) but no one has noticed yet.  I did add antennae because they are so long and prominent but the antennae can be just two swirly lines going in any direction.  Use the thin lines that I drew in to see where and how to section him off.  If you leave out one or two, don't fret....say that you were too busy thinking of how good he tastes!

Lastly, I do not have a pattern for the letters.  I just wrote the letters backwards on the fusible web paper and then made them thick.  I pressed the fusible onto black fabric and cut them out. They are only about 3/4 inch tall.  After pressing them in place, I stitched over them several times to make sure I had each one well sewn.  They are not evenly sized or spaced, although I did try to keep the letters close together so they would appear as one word.  In some cases I didn't even snip the thread between the letters because the stitches are so short and they barely show. 

And there you have it: a Louisiana license plate block!

Sunday, September 1, 2013

Sunday Quilt Inspiration: squared

Sure, squares are interesting and easy.  So, why not?  If you are considering making a quilt, any one of these would be a great way to begin.  

How, you ask?
1.  Start with a square of fabric and sew it to another square.  Keep adding squares to form a row until you are satisfied that the row is long enough.  Thirty inches is a good start, but you can certainly make it any length you want.

2. Make several rows.  If you have a square quilt in mind (equal length and width) count the squares in the first row and make that many rows.  

3.  Now you're ready to begin stitching the rows together.  Sew two rows together matching up the squares as you go. 

4. Keep going till all the rows are in place. Really, it's that simple.  

   
One of the great reasons to use simple squares is that you can use a different fabric for each square or just a few fabrics for the entire quilt.


Thanks for stopping by.  Please say hello. Only Google+ members can leave a comment, BUT you can reply if you're not affiliated with G+.....just click the reply button. Please leave your email address or blog address--I'll shoot back a "hey."