Monday, October 5, 2015

Modern Monday: Quick Bunting Tutorial

On Saturday I was able to get into the studio for several hours at a time.  How wonderful!
I have a sweet friend who has a shirt business sewing monogram letters for sororities.  She keeps fairly busy but on occasion she'll ask for help with a few shirts.  I don't mind at all and enjoy seeing some of her designs.  She's a graphic artist, so she's really creative and hand draws her letters.  Her shirts look great so they are very popular.

In the process of making her shirts, she makes lots of scraps. Lots. 


 Luckily, she happens to have a quilting friend willing to take those scraps.  Yes, of course, me!  


I think sometimes that the scraps are having babies in those baskets and bins.  Then I find this sort of surprise, and I'm really convinced.

I don't think I can use these slivers, but I've used the larger ones for all sorts of play.  I made a fabric bucket for her--so it's easier to contain the scraps.  On Saturday I picked out a few of the really big scraps.

I'd had the idea of making a quick, fun bunting in red and green felt.  However, when I walked into the studio and discovered the last bag of scraps that had been delivered, I decided to use those instead.  These scraps already have fusible web on them, but you can always add your own following manufacturer's directions.


I used my Accuquilt Studio cutter to cut circles in three sizes, so in no time I'd cut and pressed them with a piece of cotton twine down the middle, between the two pieces of fabric.


I just eye-balled the distance between circles and didn't worry about matching up the fabrics. To close off the bunting, I used one circle folded in half on each end, which gives me something to pin to. Just fold the end piece, slip the end of the twine in and press.


Sewing was very easy.  I used stitch #134 on my Bernina because it is a stair-step-like zigzag stitch that catches the twine.  Of course, when I'd tried to move one of the circles while pressing, it was impossible, so maybe the stitching was overkill.  Notice that I didn't worry about stitching the twine between the circles.  I just cut the thread away after.  And that was it.  I guess the whole thing took about 30 minutes total. 


This photo shows the bunting really well, but all I see is the messy thread.  I really need to change out my design wall covering.


I've decided to leave the bunting on the window covering for the French door for now.  It's colorful and fun, besides it's just a matter of time before a grandchild comes in and asks for it.  I made it mostly to see what it would look like.  


I think I like this quick project.  

Sunday, October 4, 2015

Sunday Quilt Inspiration: RANDOM + THINGS

Happy Sunday...
            things to inspire your quilting.

Seahorses
Морские коньки на ветке коралла | biser.info - всё о бисере и бисерном творчестве:

These seahorses are too cool! As always Waterwheel Quilt Shop puts on a great display!:

"Calypso, the seahorse, is probably the easiest one to see (the gelli prints). Much of the body is gelli and some in the weeds." - Wanda Edwards Torn Paper Paintings: Seahorse quilt.:

Seahorse Paper-Pieced Quilt Pattern at Paper Panache - some day I'll have time for this too!

Pennies
Most Valuable Pennies: A List Of 43 U.S. Pennies Worth Holding Onto! | The Fun Times Guide to U.S. Coins:

Free Wool Penny Rug Patterns | Wool Penny Rug | Ashton Publications:

Pumpkin Wool Penny Rug:

Free Quilt Pattern - Steampunk Sublime Quilt The blank design is also useful as a coloring page. :) What a neat pattern!:

flamingos 

Flamingo ♥  Let's protect our world! Help saving the planet so we can all live to continue seeing these amazing animals! Help protect their home also our home!:
Flamingo #PinCushion:


flamingo quilt!:

Metaphor in Fabric, 2010. Wonderful colors.

It's called Flamingo Fandango by Jennifer Amor:

whirligigs 
Funky Chicken Whirligig/ƸӜƷ•¸¸.•*¨*.ღ.•.•❤•. ʚϊɞ Рŗĭņċęśş ʚϊɞ .•.•❤•..ღ .¸¸.•*¨*•ƸӜƷ ¸.♥¸¸.•*¨`*•✰.•´* •´* .•´*✰¸✿ "Ťħĕ ßęśť Pļąćė 2 Ŝĕēķ Ğőď Ĩş Ĭŋ Å Ĝāŗďęʼn..Ū Ĉąň Đĭģ 4 Ңĩm Ŧħėŗē!" ✿¸.♥¸¸.•*¨`*•✰.•´* •´* .•´*✰¸:

How to Make Whirligigs & Garden Pinwheels...I have pinwheels out by my strawberry plants. The pinwheels make noise & reflect so it keeps the birds away!!:

Moda... the Cutting Table: Quilt Moments - Twister Quilt patterns and layouts

sew katie jean: summer quilting - good for sraps:

Whirligig: Eleanor Burns Signature Quilt Pattern:

lightening
i love lightning because it never looks the same as another flash. this photo is beautiful the way the lighning strings bend away from the clouds and strands fall off and away from the main strike and then gets covered by the clouds and then is shown hitting the water-k

Job 36:32 - He fills His hands with lightning and commands it to strike its mark.:

"Bolt gets her name because she reminds me of a bolt of lightening blazing through the sky. She measures 48" by 60" and is made up of Birds in the Air blocks," http://mamalovequilts.blogspot.com/2013/01/tutorial-birds-in-air-quilt-block.html:

zig zag lightening, single seam squares, perfect for scraps, so many reasons to love this

vintage Streak O' Lightening quilt from Hattiesburg, Mississippi

Happy Sunday, 
And happy quilting...

Saturday, October 3, 2015

A Finish! (just not mine)


I'm taking credit, however, because my double-dog-dare is what started it all.
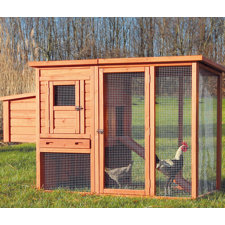
Trixie Chicken Coop with Outdoor Run
Our son got a chicken coop for his birthday back in May.  It's one of those prefab, easy to build coops that's ready for chickens in a day, or two.


Of course, the moment I saw his cute little coop, I wanted one for my own chickens, but Richard decided that he could build a better one, and much cheaper.  But that was back in May.  

Since then hungry raccoons have come for a few meals.  Also since then seven little bantams were hatched.  We've housed them in a coop that at least has kept the coons away.  They are getting too big for that small coop, so I mentioned our buying a pretty house like Rory's.  

Well, I got that same "build a better blah, blah, blah."  Without thinking, I spouted off (something I tend to do), "Sure, sure you can. And you will....not."


Of course, he threatened to start "tomorrow."  I didn't really believe him would.  But he did!  

He's been working on it for weeks.  It's a slow process when all you can do is cut the wood and put in screws.  He has to wait for someone to come hammer in the nails, because he suffers too much with his back to lift heavy wood or hammer any nails, especially those monsters he likes.  

Check out his resourcefulness...Rich recycled a handle that Adam removed from the carrying frame of a new door.


A porch.  Yes, he added a porch on the front of the coop.  That's so the chickens can sit and cackle in the afternoon.


There's a roosting ledge that goes all around the house. And, thinking that maybe he'd like to have a few pigeons, he added some nests from a previous pigeon-house above the roost.

My very favorite are these two old hinges. They are old and rusty and way too big for this little door, but they came from my daddy's old barn in Plaucheville.  

People have been stealing the cypress wood off the barn and these were left behind, so Rich brought them home thinking he'd find a use for them.  I love the creaky sound they make when the door opens and closes.   

Plus, because they are so rusted, the door simply stays put at any angle--less worry about it closing on a chick.


How about this?  He's just too funny.  He asked me for an old wooden spool to use for a handle on the door latch, but I didn't have one.  I did have a new plastic spool and an old bent bobbin.  So the put the bobbin in first then added the spool on top to make a perfect handle.


Nests...


and more nests.


and some really happy bantams.


Roost approved.


Not a bad life for a chicken!