Showing posts with label batting. Show all posts

Monday, October 10, 2016

Pincushion Tuffet ~~ Tutorial and Finish!

At a recent quilt show I saw a sweet tuffet pincushion pattern and kit. I didn't want to spend that amount of money on a fun, but unnecessary, item. So when I got home I asked Richard to cut a circle from a piece of scrap wood. The nut cut three! He decided that since I couldn't tell him exactly how big I wanted, he would give me choices. 

Since I made my own pattern, of sorts, and made a different type of tuffet, I thought I'd share my process and reasoning. Know, however, that mostly I wanted to make something quick and easy and just see if I could figure it out on my own.

I started out by gathering the materials that I thought I'd need. It turns out I used a few more items. I started with a fat quarter, the wooden circle, a ruler, staple gun, quilt batting, foam, needle and thread, and a pencil. I added a glue gun and glue, and (these I forgot to put in the picture) the antique thread spools that I used as legs.


 I used the wooden circle to measure the foam and the batting. I cut the foam to the exact size of the wooden circle. Because I used scrap batting, I cut the outer edges of the batting pieces to match the circle and allowed the center sections to pile one on another. I also piled in the cut off pieces so that the batting would be higher (or thicker) in the center of the tuffet. 


To measure the fabric, I used the wooden circle as a measuring tool by placing it in the center and measuring three inches from the outer edge of the circle, then marking about every two or three inches.  I decided that I needed about three inches extra to cover the wooden square, foam, and batting by stacking all of it on the fabric and folding it around the stack. It was just a guess but it worked perfectly.


I used dark colored thread so you could see it against the fabric. This seam ends up on the bottom of the tuffet and doesn't show, so I left the dark thread.  When I got to the end of the fabric, I was running out of thread, but knowing I'd gather it eventually, I simply allowed it to stay gathered. 


The next step is to stack the batting on the foam and flip it over and into the fabric. Tuck it all in and check that it's relatively smooth. 


Add the wooden circle on top of the foam and pull the thread so that the fabric gathers up around the wooden circle. Pull it tight and tie it off, then cut the thread and tuck the pieces into the fabric.


The moment I dropped in the first staple, I cut the thread. Darn! I carefully put three more staples in, then tied more thread to the broken one and resewed the fabric. At this point I decided that I needed to hot glue the fabric in place. It was impossible to trust that thread.  


Although I originally planned to use small nails to hold the wooden thread spools, I had a hot glue gun that was ready to go. Naturally I took the easy route and glued those babies down. 


The tuffet sides are a bit looser than I had hoped but it's okay.


In the end, I really like this pincushion. I used the middle size wooden circle, so that means I can make a bigger one and a smaller one. I've decided that I'm going to try something a little different for the next on, maybe make it more fitted on the sides. I also bought only four small thread spools, so I'll have to find something else to act as feet. 


What are you thinking? I'm curious what you think about the tuffet, of course, but I'd also like to know about my tutorial. Are the instructions clear and easy to understand? Do the photos clarify the instructions and help with understanding? Please feel free to give feedback--positive or negative, it doesn't matter. Much more important to me is that I improve pattern/instruction writing.

Happy Quilting!

Thursday, June 20, 2013

Design and Redesign

This is the blue and green quilt on my design wall.  It's not exactly working for me, but I'm not sure what I need to do.  If it would open up and speak, I might have a chance, but for now it's awfully closed-lipped.

There's something to be said for snapping a photo and taking a good look at it: I realized that the strips are separated on the design wall.  There are two distinct versions of the strips: one dark and one light.  

Hmm, I'm going to have to watch for this when I get ready to sew them together.  I didn't realize that I "randomly" separated them.  I did randomly sew strips together.  Strange how this worked out.

New to the studio are three bulk items: two bolts of muslin for backing, which I picked up today.


 And one roll of batting, which arrived via UPS while I was out.  It's so nice to come home and discover something like this at the back door.

I guess this means I have no excuses for finishing that quiet quilt on the design wall.  I'll just have to get in there tomorrow and sew up some more strips and see what they say.


If the quilt spoke to you, please share!  I could use a helping hand!

Saturday, December 1, 2012

________ Bucket ?

Did you say "scrap"?  If so, you're probably a quilter or know one really well.  Of course it's a scrap bucket: it's a bucket made of scraps but it's also made for scraps.  I know, I've gotten a little too silly about a fabric bucket, but when I get to mix language and quilts, I can't seem to control myself.

And if you think my silliness is tedious, maybe it's good that you don't get to see me when I'm off the meds!  It's not pretty.

So, back to the bucket (cause that's more interesting anyway), I saw a photo on the Quilting Board about two weeks ago and decided that I had to make one.  I think there may be directions, but I decided to wing it.  

I started out by using the waste basket in the studio to draw a circle about the size I wanted on some old fabric from mom's stash that I should have tossed out.  It's yellowed and smells of moth balls, and has blotches of blue ink (or something unrecognizable) and couldn't have been very pretty new.  But I couldn't toss it, so I decided it would make a good "prototype fabric"--my word for fabric used to make my own patterns.  

Once I had a circle, I decided to use some scraps and some unused blocks rejected in other projects.   I measured the perimeter of the circle to get the width measurement for the bucket sides and chose the height based on the size of the rejected project block.  

I sewed scraps together and added them to the reject block to get the width I needed, then quilted it with large feathers and scrolls and squiggles--basically anything--just to get finished quickly.  In the end my winging it worked out beautifully, and what should have been the pattern, well, it IS the bucket.....ugly fabric, scraps fabrics, and rejected block.

I didn't see this blue stain till after the fact.
To help it stand open when empty, instead of batting in the bottom, I used a heavy interfacing and added some thin wire in the top.  Of course, the interfacing was adding during construction, but the wire was an afterthought.  

I simple slipped the wire into the binding and fed it through until it went completely around the top. Then I cut the wire and pushed the cut end into the binding so that the wire is completely enclosed in the fabric.  Now I can shape the top to stay open so that when I toss scraps in, it's easy to dunk them.

I also added two large handles that stick out from the sides to make it easier to grab and also so they will flip up over the top of the basket to make carrying easier.  All in all, I'm really pleased with my scrap bucket.  


Richard was a bit impressed but Adam begged me to make him one just because it's cute and looks fairly useful.  He's not getting one, of course, but it was funny that he wanted a fabric bucket for no real reason.  Imagine him going on a job with his tools in a pretty, quilted fabric bucket his mom made!  Now that's a man!

Friday, November 23, 2012

Black Friday Finds

I'm not much of a shopper, but I do enjoy getting out for a while on the biggest shopping day of the year.  Jenny and I went to Rayne to meet Meggan and her mom, and together we hit a few stores, had lunch, then ran errands before heading home.


It’s probably good that we didn't attempt any marathon shopping because after about three hours, I needed a nap to drive home!

 I hadn't purchased many items, so Jenny and Meggan suggested I go to Jo-Ann Fabric and Craft Stores.  (Now that I think about it, I may have abandoned my crew a little too quickly.  Sorry girls.) 

They had a few other places to go, so I got dropped off with instructions to call when I'd be done.  Ha!  Are you kidding?  They called me twice.  On the third call they were waiting in the parking lot.  I understood and came running out with three bags of queen-size batting, which, by the way, gives the mistaken appearance of loads of stuff.


Two pillow forms in one really large bag sort of adds to that misconstrued image of one lone shopper purchasing a quilt shop.


I did buy a few other things: a ruler to replace the one I broke, a seam ripper to leave near the long arm machine (with the hope that I won't need it), and suction cup handles for rulers and templates.


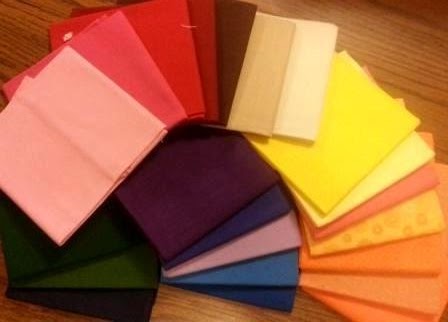
 And because they were on sale ($1 each) and I've been a very good girl lately, I picked up solid fat quarters in every color of the rainbow to add to the stash.


What fun!  The girls' timing was perfect: any more and I may have started picking up things I may not need. 

What Black Friday finds did you bring home today?