Showing posts with label designing. Show all posts

Saturday, June 29, 2019

20 Skills Every Sewist Learns

Have you ever wondered what skills you've learned as you picked up sewing? It was a topic of discussion on one of the Facebook groups where I'm a member. The writer mentioned several and others chimed in. I've compiled the list of skills with a few examples of each. This list is certainly not exhaustive, but it's a great way to get started thinking about the many skills you have learned along the way.
  1. Artistry (creating and designing, use of color, fit and form)
  2. Chemistry (fiber content, treatment and care of fabrics, glues)
  3. Color theory (using color, color wheel)
  4. Conservation (avoiding waste, recycling)
  5. Construction (basting, stitches, sewing buttons)
  6. Efficiency (meeting deadlines, completing projects)
  7. Finances (making purchases, budgeting)
  8. Fine motor skills (hand sewing, putting in zippers, easing)
  9. Following directions (putting patterns together in order)
  10. Gross motor skills (cutting, using large equipment, setting up work-space)
  11. Hand eye co-ordination (threading needles, sewing straight and curved lines, detailed handwork)
  12. Math skills (basic math, fractions, geometry)
  13. Mechanical skills (threading and adjusting machines, long-arming, cutting equipment)
  14. Physics (fabric content, drape, pressing, lighting and electrical)
  15. Reading comprehension (patterns, books, magazines, blogs)
  16. Spatial awareness/geometry (sizing, fitting pieces together)
  17. Teaching (planning and teaching the next generation)
  18. Technical knowledge (selecting fabric, thread, and machines; adjusting patterns)
  19. Terminology (specialized vocabulary)
  20. Troubleshooting (diagnosis and repair of machines)
What have I missed? Add your ideas in the comments! 


Friday, January 19, 2018

Neutrals and reds and math


Oh my heavens, y'all, I do not know a bit of math. Nothing. Nada. Puh. How do I know? Because I needed math all day. Know what I got? Puh!


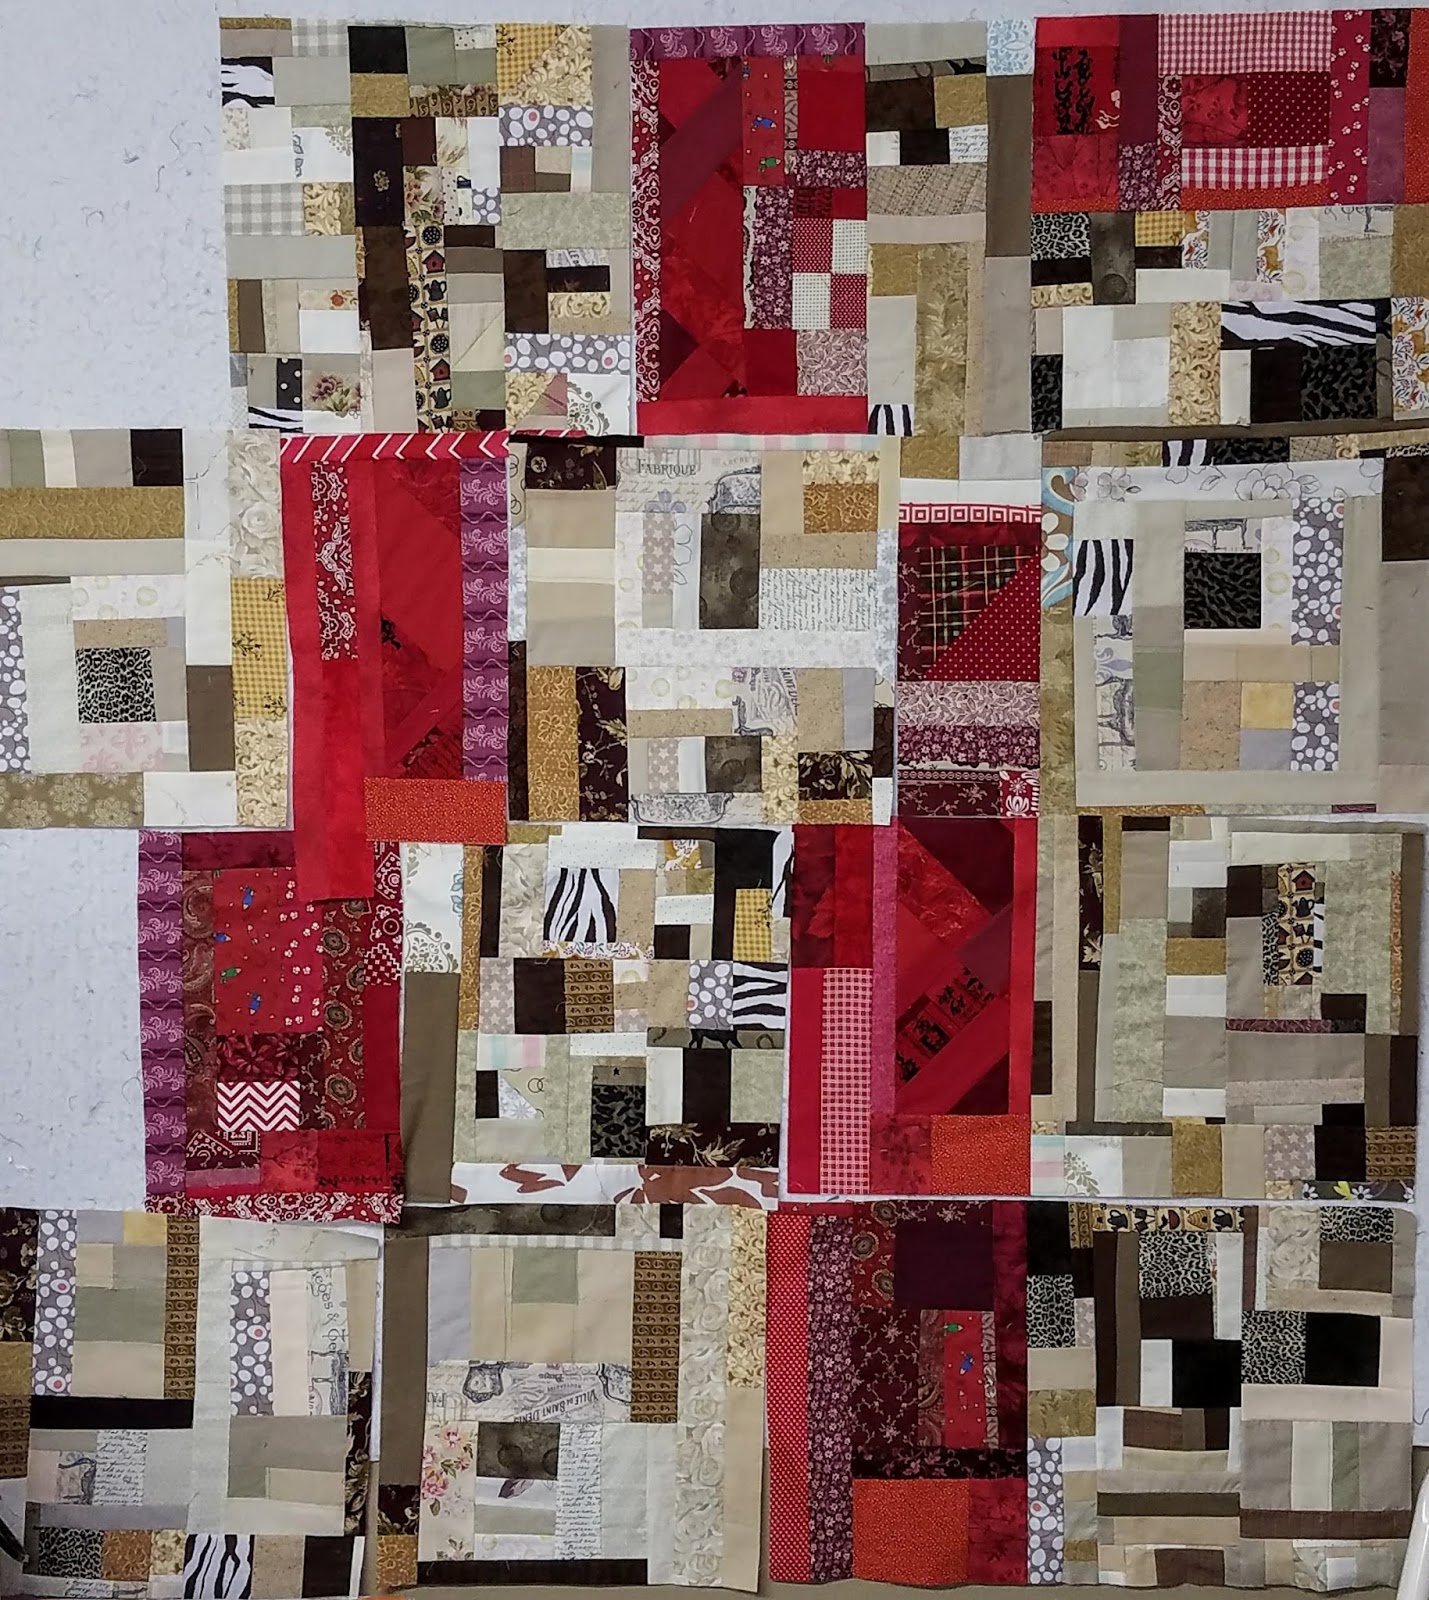
I've continued working on the neutrals scrap quilt top. Thanks to your encouragement, I decided to keep going with the red scraps because, I wanted to make it work. I'm hard-headed that way. Besides, I had sewn some of the scraps into fabric blocks. 


I have a 15" square ruler and cut the beige pieces into uniform blocks to match the ruler. That was easy and helped me with the math. I'd made about nine of the blocks before beginning with the red. As I added red chunks to the beige blocks, I re-cut the blocks so that they were back to 15". But I have more creativity than good sense, meaning I abandoned the one thing that made the math easy.


I started adding red to the beige blocks and didn't make the extra cuts. Instead, I made bigger blocks and tried to match them up. That didn't work. I rearranged the crazy big blocks. No. 


I rearranged and made strips. Then I rearranged those strips, adding more beige in places, thinking there was now too much red. No! 


Then finally. Finally! I arranged the pieces on point. Yes. That somehow did the trick. I liked the angles of the individual pieces and small strips. 

So what's the problem? Well, math. As long as I had uniform blocks, I could do the multiplication and division. But now things were happening on an angle and in an unsystematic manner. The biggest blocks were all about the same 15 x 20, so I made one strip of those. Sewing them on the 15" edges? No. That would make the strip match the others. 


So I have one strip that is 20" wide; none of the strips are equal in length; and everything is on an angle. Yes, there's a chance that this quilt will unravel me! 

When I decided to phone a friend, I considered calling my sister Lee. She teaches high school math. The hard math. But I figured that I should ask Richard first. I called him and tried to tell him what I needed to know. Turns out I couldn't really explain it to him. Regardless, he was stumped. Okay? So then, I'll call Lee. He laughed at me! How dare he? 


Then he told me why he was laughing. I didn't know what to ask. Honestly, at the time I couldn't even think of the words equation or formula. How do you tell a math teacher what you need if you don't know any of her math words? 


In the end I decided to keep adding pieces and triangles until the 15" strips match the 20" strip. But they have to match on an angle. 
Check out this last picture. I have two sides with straight edges! And know what? That crazy 20" strip is in there! It IS the upper left corner and matches up with the other strips. If you look on the bottom right corner, I have another corner. Whew! Math is stressful!

Link Ups!

Saturday, June 10, 2017

Back to the Blues ~~ 2 finishes!

Catherine (Caki)
I've returned home from Rory and Meggan's house. She is feeling better and moving around more. I thought it would be a good idea to give them a break for a few days. Honestly, I was missing Richard and maybe getting a little homesick. Oddly, that doesn't happen when we travel. I guess the camper feels enough like home and Richard is with me.

I loved having time to spend with the girls. They are an hour away, so visiting
Sophie
isn't a quick 
drop-in for hugs and to  say hello. At six and seven, they are sweet, respectful girls who love to play. An hour of "Go Fish," an hour and a half of "Shopkins" which almost requires crawling on the floor. (Not for me! I directed from the sofa. :) They are learning to jump rope and fussed over whose turn it was to "do" Grandmay's hair. Before I knew it, the day was gone and it was time for baths and supper. My three days passed quickly.


Never the less, it's good to be home. I drove up to a pleasant surprise; the calla lilly that Richard gave me for Mother's Day last year bloomed! It's not terribly large but the color is a brilliant yellow. It's in a pot next to the yellow lantana that's somehow survived the last four winters. They are at the edge of the parking pad and are a colorful spot of cheer.

While Richard fried some fish for supper, I played in the studio. The blue blocks (here)that I'd worked on earlier in the week were still waiting on the design board. So I started out by sewing those together and in no time I had a completed quilt top. (Baby size, sure, but still a complete top.) Notice that I chose the layout recommended by a couple of readers. Thanks y'all.


While cutting out the blocks for that quilt, I had cut another quilt just like it--there's really lots of blue scraps! Then I used the second quilt as a leaders and ender project while sewing the first quilt. I have sewn using leaders and enders: I think it's too confusing for my brain to handle. But how could I go wrong here? I just pretended it was the same project in different stages. 


Since most of the blocks were at the half-way mark and some were complete, I decided to figure out what I'd do with them. I really didn't want two of the same quilt, but I had the same blocks. 
Ahh, an idea. I added two more strips to each block, cut them off-grain, and turned them into wonky blocks. I played around with the blocks on the design wall and finally settled on a layout. Sewing them into a quilt top took no time at all. Ha! I'm not even sure how much I like it, but it's another (baby) quilt top and has found it's place on the pile that needs quilting. 


Tuesday, April 19, 2016

Customer Memory Quilt ~~ Finished

Welcome to TGIFF! I am very pleased to host Thank Goodness It's Finished Friday and especially want to thank Fiona for her help and support. What a nice gal!

I've been working on a customer quilt that took longer than I expected. One of the reasons for the extra time had to do with my playing. I always do that. Play with the quilt. 


Maybe I'm afraid that quilting will become work if I don't get to play. I do enjoy the playing part!


I pulled motifs from the shirts to create the quilting designs. That was so much fun that I played on the entire quilt...spending much more time on it than I should have. 


This quilt is heavy. As in weight kind of heavy. The shirts are synthetic and heavy despite the fact that many are mesh. Of course, because they are mesh, I had to add a quilting-weight cotton under them. To reduce the weight of the quilt, I cut away the backs of the shirts and as much of the bottoms as I could.


But mostly I played. Did you notice the extra work I did with the red and white uniform? The undershirt is quilted, but the sleeveless over-shirt is not so that it can be buttoned closed or left to hang open. Rather cool, don't you think? I played a lot! But I had fun doing it.


Quilt Stats
Name:
Sports Memories
Size:
84" x 88"
Fabrics:
customer shirts, Kona solids for front, natural muslin from backing
Binding:
Kona Olive
Pattern:
improvisational design
Quilting:
custom free motion quilting  
Completed:
April 2016

The fabric yardage was included in last month's report with all the other purchases, so this month it get counted as usage from my stash. I have no intention of counting purchased fabrics twice! Of course, you don't think that the report will show a wash, do you?

So now it's your turn! What have you been working on? What's your finish for the week.  Click the link and I'll be visiting your blog in the next few days.  


Tuesday, October 20, 2015

Alayna's MORP Dress


Last week our granddaughter Alayna called and asked for help with a MORP dress.  I knew I was getting into something serious, but little did I know that it would mean changing the design of the dress.


I should have known.  I tend to get into these situations easily.  But who can say no to, "Grandmay, please."  Not me, apparently.  So they arrived late that evening for a fitting, giving me a couple of days to I could figure out the problem and start considering some solutions.  


The dress was just too big.  When her mom ordered the dress online, she had to measure Alayna.  Scared of getting a too-small dress, she was generous with her measurements.  


I would think it was a half-size larger than needed in the bust-line and back.  The halter straps on the bodice were much too long, but there were a couple of hooks so they could be adjusted.

I realized that the straps could be the solution if I could just figure out how to change them to regular straps that would hook in the back. So that's what I did--I moved the straps.  


Instead of a halter top, she now has a dress with straps that connect to the back.  Since the straps weren't long enough to reach the bodice back, I made slim little bands using cording and slivers of fabric stolen from one of the side seams.  Since the dress is covered in chiffon, I had no choice but to treat it with extra care.  I sewed everything before cutting and used fray check to help control the fraying on the little cords.  


I had to hand sew the cord ends onto the back, then attached it to the wider straps.  There are lots of beads on the straps, so I didn't want to fold them under and have them pinching and pricking her skin all night.  I also didn't want to cut the cord and risk messy ends sticking out.  I certainly did not want to take any stitches out!  


So I chose to hand-stitch the cord to the strap from one edge to the other. It worked very well!  To give them a finished look, I added some beading on the small corded bands.  The beads don't match exactly, but they are close enough that even Alayna thought I'd somehow found matching beads.


They returned on Thursday to pick up the dress, redesigned, finished and pressed.  A boxed ride from the manufacturer to Louisiana is pretty rough on an evening dress, so it needed a little TLC in the form of my little steamer.  Alayna seemed very pleased: for a young lady who is very quiet and shows little emotion, she was downright giddy with happiness!  Go Grandmay!  


Quick update: I saw Alayna this afternoon and asked about her dance.  Her reply, "Awesome!"  And the dress straps held up (I was a little concerned).


Linking up with lots of parties tonight!
How I managed to catch them all is beyond me.

Finish It Up Friday at Crazy Mom Quilts 

Tuesday, September 22, 2015

Pin It Weekly#120

Headerlogo_new"How about some fabric?"
"Sure," she said, "where to?"
"Spoonflower!" he answered.  And off they went.

 Julies Campers fabric by juliesfabrics on Spoonflower - custom fabric:

.a shot in water. just blue fabric by emilysanford on Spoonflower - custom fabric

Little Woolf Fitted Crib Sheet in Bohemian Arrow by littlewoolf on Etsy-fabric by bohemian gypsy jane on Spoonflower

Jungle Passion light gray background fabric by joanmclemore on Spoonflower - custom fabric

Well, maybe it's not amazing, but it's mine! Camp Firefly fabric by wendy_lin on Spoonflower - custom fabric

Baby foxes fabric by heleenvanbuul on Spoonflower - custom fabric:

Nutcracker Ballet - by Andrea Lauren  fabric by andrea_lauren on Spoonflower - custom fabric

.:

Jungle Flowers fabric by weegallery on Spoonflower - custom fabric:

Make it Snappy! fabric by pennycandy on Spoonflower - custom fabric

Scallop_Fun fabric by stacyiesthsu on Spoonflower - custom fabric:

Dutch fabric love!  fabric by bora on Spoonflower:


Here's how Spoonflower works:
1. You upload your own image (or make sure it's royalty-free).  2. You choose your product--fabrics, wallpaper, or gift wrap.  3. The Spoonflower team create your product in the amount you order and send it to you.  

The low-down on the downside: it's expensive.  Get ready to pay $18 a yard for fabric and $15 for a roll of gift wrap.  

Can we say PERSONALIZED?  It's pretty amazing and it's lots of fun to see the faces of gift recipients when you tell them that you even designed the fabric!


This is my Spoonflower fabric, which I call "Hello Beautiful."


And these are some of the small makeup bags that I made for the girls in the family.  

Fun projects to design, make and give...thanks, Spoonflower.

Thursday, September 10, 2015

Feather in my cap...uhm, quilt!

Last weekend I had an irresistible urge to make a feather block for fun.  It was one of those have-to urges.  As in, I have to make a feather block because I've been thinking about it for some time. 
(I know there should be hyphens between all of those words, but... no.)
feather bed quilt pattern by Anna Maria Horner (This is a free pattern in the make section at annamariahorner.com):
I did a quick Pinterest search and found the Anna Maria Horner "Feather Bed Quilt," which I love!  I wanted very much to make something using this feather design.

Feather Sewing and Cutting Tutorial - a minimal waste version. Awesome!! | Olivia Jane: A little more looking and in no time I found this tutorial on Olivia Jane Handcrafted.

Of course, there are many other great tutorials on Pinterest and other blogs, so if these don't work for you, there should be no trouble finding something that does.  Just search for "feather quilts."

Of course, I just wanted a jump-off and got going on my own in little time.  I started by sewing together some 2 1/2 inch strips that I'd bought some time ago and then supplemented with more cuts from the stash.  To add interest, I cut a few of the strips in half before sewing.  


my three-feather block


I made a quick pattern from scrap paper and figured out how to cut each half.  That was a little confusing at first.  It's one of those things that I needed to visualize.  After making the first 45 degree cut, it was much easier.


I also made a pattern for applique feathers. These have more rounded edges and look more realistic except for the fabric and colors.  To achieve the rounded tip, I added two small darts on the right side.  Then I cut some deep, narrow notches.


Richard came into the studio and saw my feathers.  A few minutes later he returned with these beauties.  Little did we realize at the time that they were on the ground because the nuisance alligator had already come for a visit.  The alligator may have eaten the chickens, but it didn't devour all of the feathers.  They were very helpful in giving me a visual guide for the applique feathers.

The result of my little play session.  The colors, however, are not true.  I think the bright yellow is really between these two tones. One photo was taken under the florescent light and the other in partial natural light.  The difference is amazing.


My plan for these two pieces is to quilt them and then make a tote bag for carrying school stuff.