Showing posts with label purse. Show all posts

Saturday, September 9, 2017

Flowers, etc. finished!

I've been very busy recently, but not really telling you what I've been up to. I haven't any idea what I've been posting, but it's time to show you two little projects.

The first is a set of flowers that I've recycled for our church. When our youngest son and his wife got married, I bought and arranged flowers to put on the tables during the rehearsal supper. At the time I had four containers of these beautiful deep purple peonies with some greenery. Both the eggplant and greenery were wedding colors.

The wedding was several years ago--Rory and Meggan now have two girls, 6 and 7. My parents died not long after the girls were born, so I thought I'd use the flowers in arrangements on their graves. I have seven sisters, many of whom put flowers on the graves, so the opportunity never presented itself. However, it's time to make some decisions about the extra things in my studio. Use it or toss it, but no more hoarding it.  


The flowers are too pretty to toss, and they are in beautiful condition, so I decided to re-arrange the flowers and give them to our church. One of the smaller vases was cracked, so I removed the flowers, shared them among the other three vases and tossed out the broken vase. I brought the flowers to church this afternoon and put them in church. The larger vase, meant for the head table at the rehearsal dinner, is now on the floor in front of the main altar, and the two smaller vases are on either side of the back altar. 


The other small project is a group of small, round purses. They are just the right size to hold a set of earbuds and cellphone charging wire. I'm hoping that the colors will be appealing to teens and pre-teens. These will go in my booth at the craft fair in a few weeks. I'm no longer concerned about having enough items. 

Anything that I add to my inventory from now will be beyond what I was planning for. If I do have time, I may make a few more of these little purses and a few more rectangular bags to use as pencil cases or makeup bags so that I can have a larger variety of lower price point inventory, but it's not going to be a huge disapointment if I can't get to it.


I've finally gotten the printer working so I can print some price tags and business cards. I've checked on bags and have enough left over from a previous fair, so that's taken care of. 

Hopefully I can get to a practice run on how my booth will look. I plan to set up the canopy, hang quilts, set up tables and two shelves with small items, and figure out where I'll have a "checkout" area.

Several years ago I had a booth at a festival. It was awfully cold, so I was dressed for the weather, not the occasion. I had not really thought so much about how my booth would look, and though I did a dry run, when I looked at the photos later, I was shocked and saddened to discover my booth looked more like a flea market than a micro-store that I'd like for my brand. 

This time around I want to do it right. Whether there are many sales or I barely make enough to cover my costs, I want people to walk away remembering my booth. Of course, I want their memories to be positive.

But just as much I want my booth to have a clean, modern look. I'll post pictures of the booth after I practice. I think taking pictures and looking at them as I add/subtract ideas and things will help me to see the booth the way other people see it. 

If you have suggestions of other things I can do, I'd really appreciate your input, both now and when I post pictures in a few days. By the same token, if you know of interesting posts or articles that might help me, please send the links either to my email (mary.marcotte@gmail.com) or in the comments below. I need and want your opinions and input.


Because it's already Saturday night--we've been working at our annual church fair--so I'm late to all of the linkup parties. Only a few linkups left open, so I'm extra grateful to them.


Loving these Linkups

Friday, March 4, 2016

Puttin' on the Glitz


There isn't much in the way of sewing going on around here. I did, however, manage two little snap bags. Both in a pretty white and gold Michael Miller Glitz collection. These fabrics must be fat quarters. Regardless, I made a quilt sandwich with the whole piece, quilted it using the design in the fabric and then cut it half to make the two bags. 


I added the little tab in the center of this one but then decided that the lame' fabric I'm using for the trim is too finicky to deal with. So only one has tabs. They're useless anyway because I had to hand-sew them down. Otherwise, they stick out like ugly ogre ears.


These are larger than the first one I made two weeks ago, so there's plenty of room for stuff. Pencils could easily fit in here.


This picture shows you the bags on top of another piece from the line. I may may a couple more bags in one of these fabrics. I think they'll have an elegant feel in the black and gold. Now that I look at the picture, that darn tab does add an extra touch. Darn, I may have to deal with that lame'. I'll add lining to that fabric also in the hopes that it will be easier to work with. 


Linking up with 

Monday, September 28, 2015

Modern Monday


I've made a few of these little rosary wallets.  After I made one for myself, I got rather enthusiastic: I wrote this tutorial and cut out three or four more.  I've been able to sew up one.  So much for enthusiasm.


A friend who has a small shirt business (which I wrote about here) has asked me for help sewing the appliques onto some of her shirts. 


Those projects have kept me plenty busy enough, but then there's also been work.  Specifically, homecoming.  A parade, football game, class activities, pep rally, and dance.  I had to chaperon the dance, which means strobe lights, loud noises, sweaty smells, and a late night.  In a word, migraine.  Ah, the things we do for students.


So I've been keeping busy with lots of modern fabrics and small projects, but it's almost time to get back to a quilt or two.


What modern fabrics / projects have you been up to lately?

Linking up with

Friday, September 18, 2015

Tutorial: Coin Purse


After making my sister a small wallet to hold her credit cards and keys, I decided to use the pattern to make another to hold my rosaries.  Since I keep two rosaries in my purse and have had to take measures to keep them from tangling, I thought I'd solve that problem, too.

Materials List

paper for your pattern
3 coordinating pieces scrap fabrics 9" x 11" or larger (One for each of the following: outside fabric, lining, and separating divider.) This picture shows the pieces already cut and placed in neat stacks.)
7" zipper
batting scraps 
fusible webribbon scraps approx. 6" long


1. PATTERN and CUTTING  I used the pattern that I'd made for my sister's wallet.  To create the pattern, traced around a credit card, then added 3/4 inch all around.  I wanted to add seam allowance and a little extra so that it would be easy to put the cards in or take them out.  The pattern is 5 1/2" w X 4 1/2 h (The purse is oriented in a landscape design.)


2. ZIPPER  Start out by inserting a 7" zipper.  Match one of the lining pieces with one outside piece, right sides together (rst), slip the zipper between the two so that the outside edge of the zipper tape lines up with the top of the purse.

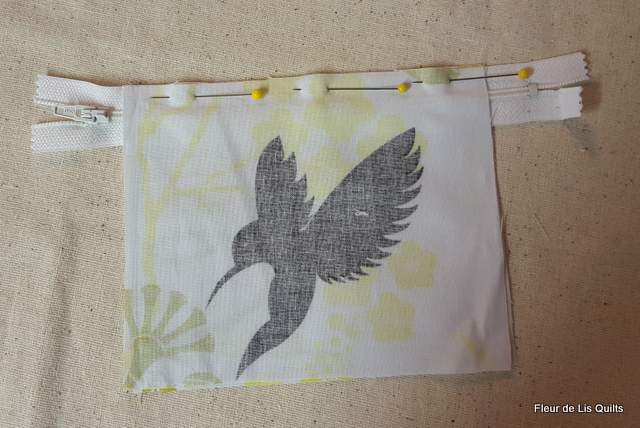
 My fabric is a one-direction fabric, which means that I had to be extra careful to make sure the birds were flying right side up.   You may have noticed that the zipper is centered in the fabrics and that the top and bottom stops are far from the fabrics.  This is to be able to fold and sew the excess zipper down into the purse cutting it.


I pinned the pieces in place then turned down the outside fabric so that I could check the hummingbird.  I also checked to make sure the zipper was facing in the right direction.  The zipper pull, or slider, needs to be on the same side as the outside fabric.


3.  Once I was certain that I had the fabrics oriented correctly, I used my zipper foot to stitch the zipper.  It's especially important to move the needle all the way over to one side of the foot, so that you don't break the needle.  I like to move the needle to the side nearest the zipper elements, or zipper teeth.  This allows the foot to hold the zipper in place as I sew because it is riding on the fabric and the zipper tape, putting pressure on all three pieces.  Of course, I pin carefully, also.


4.  After I had one side of the zipper sewn in, I flipped the fabric over and pinned it down.  I could have top-stitched at this time but, knowing that I planned to quilt the fabric, I skipped this step.

5.  Time to pin the second side of the zipper in. 

Again, I pinned both the outside and the lining so that the zipper tape lined up with the edge of the fabric and checked the orientation of the hummingbird.  This time I also checked to make sure that the fabrics lined up.  I am a smidge off (gosh, it looks much worse!) but let it alone--the side seam can accommodate a smidge.  (Now finished, the purse looks great.)

6.  MARKING THE QUILTING Before adding the batting, decide how you will quilt the purse. If you choose a stipple or other design that does not need lines, skip this part. I chose to quilt in close diagonal lines, which needed to be drawn in with a ruler and Frixon pen so that I could achieve somewhat straight lines.  


Tip: Draw the line on the inside of the purse so they don't show even though Frixon disappears with heat or friction.  (Play safe.)


Cheat tip: I was not concerned with aligning the lines since the two sides would not be seen together.  
Cheat tip: I drew in only two of the lines on each side and used my pressure foot edge for rest of the lines.


7. BATTING To add the batting, simply slip it between the two pieces of fabric and tuck it as tightly as possible along the edge of the zipper.  Tip: Less batting makes sewing in the zipper much easier, and the purse less bulky along the top.


8. QUILT  Just go ahead and quilt one side then the other.  I'm halfway, in this picture.  When both sides are quilted, the purse will be ready to sew closed.  


9. SEW Sorry, I forgot to take a picture of the divider.  It's optional though easy to make. To create a divider I cut a piece of coordinating lining fabric 5 1/2" x 9" and folded it in half, wrong sides together (wst). Add a layer of fusible web and press at high heat.  This divider is about the thickness and stiffness of cardstock.


divider in the center of my wallet
10. SEW  Close the purse by folding in half along the zipper, rst, and add the divider. Tip: the folded edge should be closest to the zipper.  Adjust the divider so that it is about 1/2 inch from the zipper. Trim the raw edge on the opposite side, if necessary.   Pin all around.  Begin sewing about 1/2" from the zipper.  Sew around the perimeter of the purse.  Be careful to catch all the layers.  

10. SEW Again Yes, make a second seam inside the first one.  I used a zig-zag stitch to finish the edge of the seam, then sewed another straight stitch between the two.  This little purse (in my case) will see lots of use.  I want it to hold.


11. TRIM Trim the corners cutting up to, but not through, the seam lines.  Tip: Be careful!


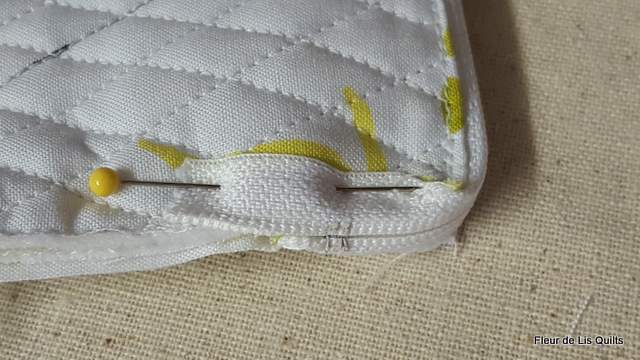
12. ZIPPER TAPE At this point I folded the zipper tape down and made a quick seam to hold it in place.  To make sure it appeared neat and clean, I stayed inside the seam allowance.


13. TURN Open the zipper as much as you can and turn the purse through the opening.  Use a knitting needle or other small object to push out the seams at the corners. Tip: Push out the corners from both sides of the divider.


14. RIBBON PULL Using two pieces of small, coordinating ribbon,  Tie the individual ends of the ribbon and fold in half.  Finger press tightly.


Slip the folded end into the hole in the zipper pull. Now push the knotted ends through the loop and pull tightly.  


And it's complete!  Add your rosary, coins, credit cards, lipstick, compact, mirror--whatever small items you have lost in the bottom of your purse--and you're in business!


Linking up with
Finish It Up Friday at Crazy Mom Quilts