

After making my sister a small wallet to hold her credit cards and keys, I decided to use the pattern to make another to hold my rosaries. Since I keep two rosaries in my purse and have had to take measures to keep them from tangling, I thought I'd solve that problem, too.

paper for your pattern
3 coordinating pieces scrap fabrics 9" x 11" or larger (One for each of the following: outside fabric, lining, and separating divider.) This picture shows the pieces already cut and placed in neat stacks.)
7" zipper
batting scraps
fusible webribbon scraps approx. 6" long

1. PATTERN and CUTTING I used the pattern that I'd made for my sister's wallet. To create the pattern, traced around a credit card, then added 3/4 inch all around. I wanted to add seam allowance and a little extra so that it would be easy to put the cards in or take them out. The pattern is 5 1/2" w X 4 1/2 h (The purse is oriented in a landscape design.)

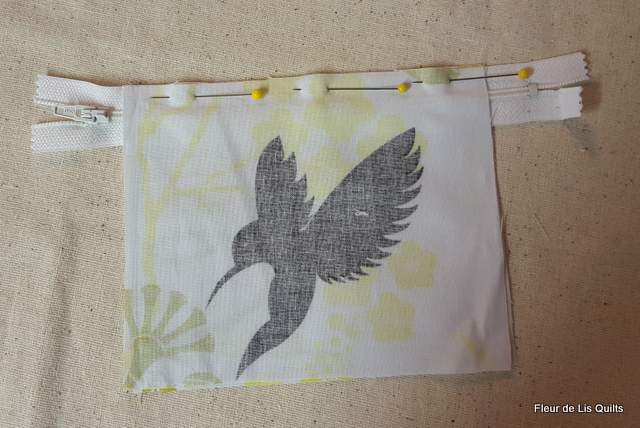
2. ZIPPER Start out by inserting a 7" zipper. Match one of the lining pieces with one outside piece, right sides together (rst), slip the zipper between the two so that the outside edge of the zipper tape lines up with the top of the purse.
My fabric is a one-direction fabric, which means that I had to be extra careful to make sure the birds were flying right side up. You may have noticed that the zipper is centered in the fabrics and that the top and bottom stops are far from the fabrics. This is to be able to fold and sew the excess zipper down into the purse cutting it.

I pinned the pieces in place then turned down the outside fabric so that I could check the hummingbird. I also checked to make sure the zipper was facing in the right direction. The zipper pull, or slider, needs to be on the same side as the outside fabric.

3. Once I was certain that I had the fabrics oriented correctly, I used my zipper foot to stitch the zipper. It's especially important to move the needle all the way over to one side of the foot, so that you don't break the needle. I like to move the needle to the side nearest the zipper elements, or zipper teeth. This allows the foot to hold the zipper in place as I sew because it is riding on the fabric and the zipper tape, putting pressure on all three pieces. Of course, I pin carefully, also.

4. After I had one side of the zipper sewn in, I flipped the fabric over and pinned it down. I could have top-stitched at this time but, knowing that I planned to quilt the fabric, I skipped this step.

 5. Time to pin the second side of the zipper in.
 Again, I pinned both the outside and the lining so that the zipper tape lined up with the edge of the fabric and checked the orientation of the hummingbird. This time I also checked to make sure that the fabrics lined up. I am a smidge off (gosh, it looks much worse!) but let it alone--the side seam can accommodate a smidge. (Now finished, the purse looks great.)
6. MARKING THE QUILTING Before adding the batting, decide how you will quilt the purse. If you choose a stipple or other design that does not need lines, skip this part. I chose to quilt in close diagonal lines, which needed to be drawn in with a ruler and Frixon pen so that I could achieve somewhat straight lines.

Tip: Draw the line on the inside of the purse so they don't show even though Frixon disappears with heat or friction. (Play safe.)

Cheat tip: I was not concerned with aligning the lines since the two sides would not be seen together.
Cheat tip: I drew in only two of the lines on each side and used my pressure foot edge for rest of the lines.

7. BATTING To add the batting, simply slip it between the two pieces of fabric and tuck it as tightly as possible along the edge of the zipper. Tip: Less batting makes sewing in the zipper much easier, and the purse less bulky along the top.

8. QUILT Just go ahead and quilt one side then the other. I'm halfway, in this picture. When both sides are quilted, the purse will be ready to sew closed.

9. SEW Sorry, I forgot to take a picture of the divider. It's optional though easy to make. To create a divider I cut a piece of coordinating lining fabric 5 1/2" x 9" and folded it in half, wrong sides together (wst). Add a layer of fusible web and press at high heat. This divider is about the thickness and stiffness of cardstock.
 |
| divider in the center of my wallet |
10. SEW Again Yes, make a second seam inside the first one. I used a zig-zag stitch to finish the edge of the seam, then sewed another straight stitch between the two. This little purse (in my case) will see lots of use. I want it to hold.

11. TRIM Trim the corners cutting up to, but not through, the seam lines. Tip: Be careful!

12. ZIPPER TAPE At this point I folded the zipper tape down and made a quick seam to hold it in place. To make sure it appeared neat and clean, I stayed inside the seam allowance.

13. TURN Open the zipper as much as you can and turn the purse through the opening. Use a knitting needle or other small object to push out the seams at the corners. Tip: Push out the corners from both sides of the divider.


Slip the folded end into the hole in the zipper pull. Now push the knotted ends through the loop and pull tightly.


And it's complete! Add your rosary, coins, credit cards, lipstick, compact, mirror--whatever small items you have lost in the bottom of your purse--and you're in business!

Linking up with
Finish It Up Friday at Crazy Mom Quilts
No comments:
Post a Comment