Do you see the red circle in the lower left corner? That block that's upside down? I didn't see that until I'd looked at the quilt through the view-finder of the camera. Since every little twist or change caused this sort of thing to happen, I was convinced that I needed help. I was just about to search out the stickers that I use to number the blocks when an idea hit me--use numbered pins!
I have some nice arrow pins from Fons and Porter that a friend gave me as a Christmas gift several years ago. I rarely use them because, well, I just don't. But it occurred to me that the arrows could help out. It was sort of nice that I didn't lose any pins while working. I've had stickers come off in the past, which never ended well.
So I searched out the pins instead and used a Sharpie to write numbers on two sets: white ones that point to the left and red ones that point up.
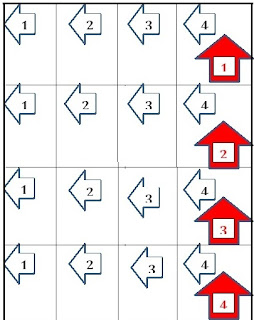
The arrows would tell me which direction to turn the block or strip and the numbers would help me to keep the blocks or strips in order. It seems a little confusing at first, but think about it: the numbers always go in order 1-10, so if 6 is before 5 (as in the pic above) the blocks are out of order. I had to rip these.
The arrows, also tell me something. An arrow pointing left tells me to turn the block to the left. That means pick up the block on the right and flip it on top of the one on the left. Only one block turns or flips...in the case above #2 flipped onto #1. Once I sewed the blocks I can check my work by opening them and seeing that the numbers are still in correct order.
Once I had all the rows made up, I did the same thing with the arrows to sew the rows together. My red arrows tell me to flip the row up. Now don't let this picture confuse you. I got to a point that I used both sets of pins to chain piece rows and snapped this pic before correcting the pins.
But, of course, I couldn't leave you with only half of an explanation--I had to build a visual. First you'd create rows, using the white arrow pins and flipping the higher number to the left, make your seam, and move to the next number. After the rows are all made, use the red arrows to keep them in order and flip each row up (following the arrow) to sew the rows together. I put the red pins all the way to the left to remind myself to start sewing on that side.
And here you have it! All the blocks are in the right place and in the right order and turned in the right direction. All I did was use arrows and numbers to help me keep them that way.
I must say, I quickly got used to the system. I was able to chain piece rows and even sew rows together starting at alternating ends so that the top didn't become warped. It wasn't confusing at all, which is not how things generally go for me. If you have these arrow pins, give it a try. I think the flower pins would work for the number part of the system, since they are flat and you could easily write on them. You'd have to remember where to start the seam but that's doable if you've been quilting a while.


3 comments:
Great solution. We all have our little ways of keeping track of layouts.
I agree that the camera is very useful for picking up mistakes.
clever you. I have to see dust puppies...LeeAnna
Hi Karen! I agree we have to have small tricks to keep track of things, but this was such an "aha" moment for me that I had to share. LeeAnna, my dust puppies are all grown up and just as bad as always. Well, these days they bring in the dust rather than help me to do the dusting. lol Thanks for visiting, girlies!
Post a Comment