Showing posts with label cleaning. Show all posts

Tuesday, January 22, 2019

A what-not-to-do DIY ~~ finished

Several years ago I salvaged a dresser mirror from certain death in a land fill. It was in perfect condition. Well, it was ugly. The mirror was dirty, but a spritz of cleaner proved it to be without scratches or other problems. The frame was  another thing. No amount of cleaning was going to make the brown, worn-out wood less ugly. 


But I could see potential there. If only I could figure out where, how, when to  use it. I mean, I didn't really need a mirror, ugly or otherwise. So it got put in the studio, where it leaned against a wall for years, a place where it could easily be forgotten. This mirror, it seems, never really had much chance of being truly rescued.


I really liked this decorative edge on the bottom.
Our master bath is getting a remodel. All new everything. Except! I've finally found a home for the mirror--above the vanity in the new/old bathroom. 


So what not to do? Ha, for starters just get to work doing something you've never done before without trying to figure it our beforehand. Or speaking to an expert. Or watching a YouTube video. Or anything that will tell you how you should go about it. 


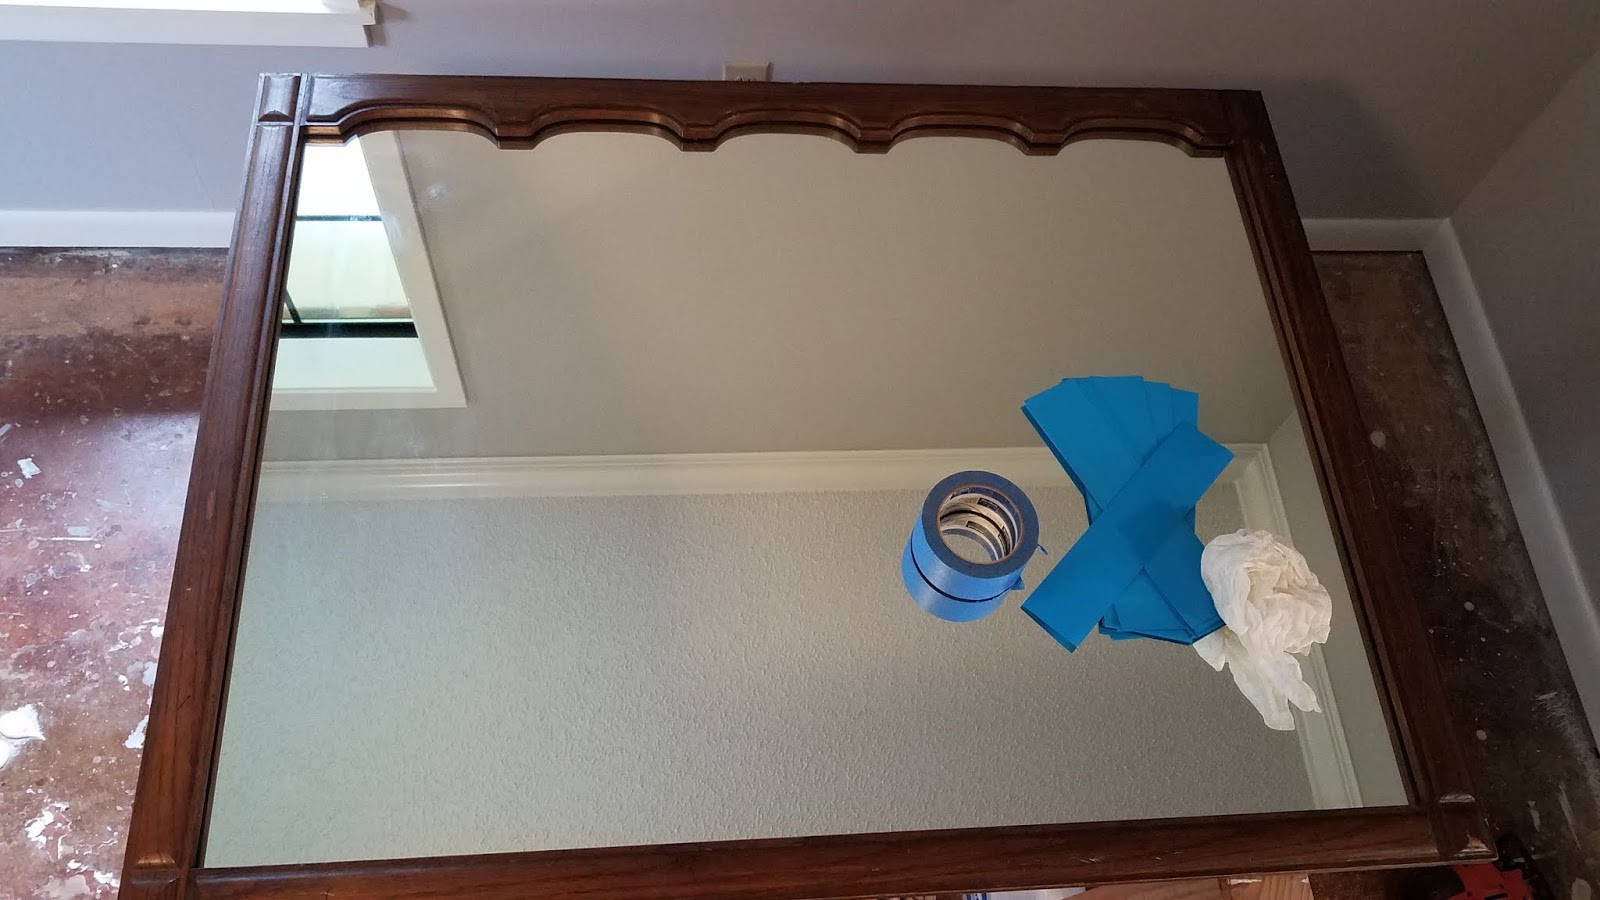
The bottom edge of the mirror, which 
would have sat on the dresser, had 
so much damage that we removed it.
That's how we started. My sweet husband knows about refinishing, painting, building, fixing, anything mechanical. Still, we ran into a problem with the mirror. He's a  superhero at taking things apart and putting them back together in working order.

In this case he chose to not remove the back panel and mirror to refinish the frame. In our defense we didn't know how old or in what condition the inside might be and didn't want to possibly cause more damage. I liked this frame!

 We decided that since we were only cleaning and painting, we'd slip cardstock under the frame to catch any spills. So the blue in the picture is paper, not tape. Important. 


A first coat of Kiltz primer. Then a second coat. And  things were looking quite positive.


A first coat of the dark gray that is my contrast color. 


A second coat and we were ready to remove the cardstock and possibly hang the mirror. Except.


 The cardstock wouldn't remove. First, the paper absorbed the paint and stuck to the wood. Second, the wood absorbed the paint and expanded ever so slightly making the space tight enough to really hold the paper.  The paper was truly attached. And stuck. Of course, I had wiggled the cardstock deeply between mirror and frame. Maybe I was a bit enthusiastic. 


I tried several ways to remove that line of blue. We solved the problem the hard way: removed the backing and mirror. Then I sanded and scraped the paper until every tiny bit of blue was removed. 
Hopefully it looks like it belongs here.

Then we ever so carefully replaced the mirror and backing and Richard, who had measured the space between the mirror and edge of the frame, stapled it all back in place. I can't tell you how many times he checked that measurement. I wondered if it would change at some point. It did not.


Finished and hanging. Notice that the decorative detail is now
 on the top. Richard built the closet reflected in the mirror.
A kidding aside, I really like the mirror. It was difficult to choosing  between white (like the window and door trim) or gray (to match the other wooden "furniture"). More pictures coming when we finish the bathroom. It's so close!

Tuesday, July 10, 2018

Cleaning Rewards~~a fast finish

Have I told you I've been cleaning in the studio? I have mentioned it, I'm sure. Truthfully, I think I'm mostly moving things around. And not necessarily advancing toward a cleaner studio. I don't know what to do with this stuff! Really, I don't. 

Here's the problem: I unearth stuff--fabric, patterns, UFOs, etc.--and look it over. It's almost always too good to toss out. I mean, I don't keep trash. But I also don't intend to use it. Ever. For example, I have over 50 Butterick patterns. Over, I tell you. And that's the smallest box of the "The Big Three"--Butterick, McCalls and Simplicity. 


Now there are some used patterns. Perhaps a little over half are used. Surely some are missing a piece or two. But nothing in that box is just pure trash. Well, not if you fit into a size 8-12. I don't. But even if I did, I don't have much need for the dresses and suits I wore when I was a young, energetic teacher. (Who just happened to be able to sew really well.)


So, the patterns. What am I to do with them? Really. Burn four boxes of patterns? And what about that 1964 pattern I discovered in my mom's box? It's getting kind of old and vintage-y. As is the 1973 and the Vogue Oscar de la Renta specialty pattern...still unopened. I'll make some kind of attempt to sell them. We'll see how that goes.


There has been one great find and this one I know exactly what to do with! This quilt block was another item found in one of mom's boxes. She had already quilted it so all I had to do was bind it and offer it to my sisters. Three of them wanted the small red block quilt from last month.


I added corners so it can be hung on the wall. If all goes well, I'll find another and each of the three who asked will get one. 

In the meantime, I continue to move things around. 

Thursday, February 15, 2018

Name tag and Studio Pics

I made a quick name tag to wear at our monthly guild meetings. I've escaped having to do that for several years because I was rarely able to attend. 

Now that I can attend every month and am president, I need to set a good example. Am I right? Besides there's a $1 fine every time I show up without a name tag. That was also okay but, let's face it, the fines will begin to add up now.


I've joined several sewing/quilting groups on Facebook recently. One of them is all about craft rooms. People share their rooms, spaces, closets, wherever they craft. They also discuss ideas and ask questions. Chatting is nonstop. 


I have been enjoying reading these group discussions and have participated in several. Finally I decided it was time to take a few pictures of the studio and share them. 


Then it occurred to me that I had a rough sketch of the floor-plan from when we last worked on it and found it among the many jpeg files I have saved. It may give you an idea of where things are and how I have set up my little work-space. 

Sewing table
Having cleaned up a bit, I thought I'd share them with you, also. The cleaning is far from complete, but maybe it's not so bad that I need to be embarrassed. My daughters-in-law noticed the difference, so there's some progress, anyway.


Accuquilt Studio cutter

Fabric and notions
Ahh, the mess that I'm working on.
 Areas are now well-defined so that each table, shelf, etc. has its job to do. No more of this playing around and thinking, "Well, I can do this here." Or, "If I put this here, I'll remember to come back to it." And, "Maybe I can do two things in this place." I'm finally resolved to keeping things in the area where they belong. 

Thread storage
Innova long-arm machine
I really like this set up and hope I can maintain it until it becomes a habit. There are, surely, some more things to do: figure out what to do with all that extra fabric, give away some of the books that are hanging out under the long-arm, and arrange those odd things that I'm not sure what to do with. All in time, I suppose. 

Next week I'll tell you how I have solved some of the storage problems that come with having lots of stuff.  

Thursday, February 1, 2018

More cleaning {scour and scrub 2}

I did a little cleaning when Richard made my new shelving unit, but why stop there? For some unknown reason, there is a table in the studio that I don't need. You know what it became...you probably guessed it: a dumping place for all the stuff that we don't need but it's too good to toss out. 


Image result for buttons
www.thirdshiftvintage.com
Most of that belonged to other people, some had come home with me when I retired, and some needed to go back to Walmart. We worked on that table early last week because it meant not really dealing with my studio stuff. The good news about some of it: I returned several items to Walmart and found $53. 


Image result for sewing notions
www.thirdshiftvintage.com
Eventually, though, I had to get over my emotional self and look at the real problem: I have too much sewing/quilting stuff. I'm working on getting some of that stuff and the emotions under control, and I've made some difficult decisions. 
  • New items that I don't need can go to my guild as door prizes
  • Fabric that is not 100% quilting cotton will be sold 
  • Fabric I can't sell will go to Salvation Army (someone else can wash and use it in charity quilts)
  • Fabric that is not good will go into the trash (okay, don't judge--it is fabric)
  • Fabric that I don't like (but is quilt quality) can go into a backing stash or be sold
Image result for ric rac trim
www.thirdshiftvintage.com
Notions are a big problem. I used to make garments, so I have buttons, zippers, lace, etc. Plus, I've tried almost every craft at some point: needlework, beading, sculpting clay, silk flower arranging, and goodness knows what other crafts. I'll try to get into that area of the stash closet once I've moved a few boxes of fabric.


I have no idea how this crazy happened but it probably began many, many years ago when I could barely afford anything for sewing. And it continued for many, many years while I worked and could afford almost anything I wanted. I was very good at bringing in fabric under the guise of other shopping. Do you have ways to sneak fabric in?


pegboard of thread in my studio
Then there were "the Garan gifts." Richard worked at a garment manufacturing plant for 25 years. Garan is the parent company that creates Garanimals clothing for children. There was a plant in Marksville, where he was head mechanic/maintenance supervisor. 

He is such a sweet husband: he'd bring scraps home and my mom and grandmother would make quilts from them. Then the factory closed. Rather than incur the costs of shipping items overseas, the company sold thread, huge pieces of fabric, and other items. Anything that was left was to be thrown in the trash. And so I got quite a few Garan gifts, especially thread, fabric, and elastic. And buttons, hook and eye fasteners, and snaps. And fabric. And thread.

It's time to edit and let some of it go. I hate doing that because it seems as soon as I do, I find a need for some of the things I tossed. Friends tell me I'm silly but it's true, don't you think?

Monday, January 29, 2018

Storage in the Studio {scour and scrub}

I've wanted to do a little cleaning in the studio for a while now. The problems of stuff piled and stacked in every inch of real estate overwhelms me. Additionally, there are things that simply do not belong in the studio. Period.


The new cabinet the middle part
with drawers is what we started with.

I started working on the problems a few weeks ago when I asked Richard to help me. Now, Richard is one of those people who is patient and loving and truly wants to help. Now. Right NOW.


After painting, there's lots of storage in this baby

I tend to forget that he's a "get it done" guy, because he often anticipates my needs, and they just sort of appear when I need them. In this case, there's no way he could anticipate what was happening in my head. Let's face it: my head. 


Right next to the long-arm, it holds all of my thread, rulers, and tools
for the long-arm and a few other items like interfacing and Heat and Bond 
So I asked for help: please take this little bench with the drawers  and build it up so there will be a base with more cabinets on the bottom and a few shelves on the top of the cabinet.  The base came in that afternoon, and I had to stop everything to get it in place. The following day we had plans or an appointment, so it took two days to get the shelves in, but then he had to take them out and do some more work. He's OCD about things being "right." 


I convinced him to help me paint, which means he painted most of the cabinet because I was too slow and didn't do it correctly. But they got painted and look great. 


Oh my! What a little paint will do! I haven't completely finished putting things away in this cabinet, but Richard almost filled it with things he decided needed to be put away. Let's hope I can find it! No matter, I have a wonderful, loving husband.


Wednesday, January 3, 2018

When all else fails...

take a nap in a basket. Somehow I got saddled with a great-grandbaby who has the sweetest disposition. Until it's naptime. Do not think you can disrupt her beauty rest. 

There are lots of things in the studio, but not one baby bed, play pen, or pallet. So we had two choices: go take naps in the camper (which included my leaving the sewing room) or improvise. Basket and quilt to the rescue. And there you have it. Who would ask for more? 

Plus, one more little detail: sweet baby does not light in her eyes when she sleeps. Therefore, I tucked her basket under the worktable in a bit of shadow. It took about 30 seconds for those sweet little eyelids to close. How cute can a baby be? This cute!

So while she was getting some well-deserved rest (I'll explain why later), I got busy with some more scrap busting. Today was red. I've run out of beige and brown scraps. Go me! So I thought I'd make several of those big 15" blocks in red to increase the size of the quilt. I may not have enough red scraps for the four blocks I was counting on. We'll see. 

Picture A
In the meantime I thought I'd explain how get every inch of scrap out of my scraps. I know, right? Can't let a little waste go to waste. Or something like that. 

Really this just explains how I deal with triangles that don't match up. Somehow I get lots of those. Let's not try to figure why that might be. 

After sewing the two triangles together along the bias cut, I put my ruler on it to try to figure out how best to cut it. Now if I wanted a square cut on the grain, I'd simply lay my ruler as in picture A above. The 45 degree line is exactly on the bias, so I'd get a nice 5" square. 


Picture B

But do you know me? I am not a square kind of gal. So I tried other options. Turns out if I wiggled the ruler a bit, I'd get this set up, as in picture B. Now, the square won't be on grain, but who needs a grain line cut when she's playing with scraps? Certainly not I!


Picture C
So I cut my "square" off grain and inched out an extra, I don't know, 1/2 inch and an interesting little something. The piece really is square. Really. I just took the picture at a wonky angle. Maybe I wanted to confuse myself, which I did, of course. I compared the pictures to determine this is the final cut. Geez, I need a photographer.


 Moving on. I had these two triangles. Not much of chance that they would ever match, so I just sewed. This is the result of not looking at what you have. No matter. I can work with anything.


This is what I did. Using my trusty ruler, I decided to cut a rectangle? out of the biggest part.


See how well that worked out? Now that other piece. I had to get at least another bit from that. So...


 Ta-da! I actually got two pieces. First I cut the larger piece from the bottom. Then, another two cuts and I have a skinny piece from the top. I should tell you that this little triangle of very pretty fabric is the only piece I had. That's a lot of incentive to scrimp out an extra inch or two.

And the last thing on the agenda: why Milly needed her nap. We sat on the concrete floor and picked thread out of the chair wheels. She worked very hard at bumping into me while I picked at thread and hair using tweezers and one of my best seam rippers. (It's the only one skinny enough to fit in those tight spaces.)


After
Before 


Milly really wanted to help clean this up, but luckily I had the sweeper and dust pan close by. That was our afternoon. How did yours go?

#scrapattack!

Monday, October 2, 2017

Six Lessons from Our Guild Quilt Show

If your guild puts on a quilt show, you may have all the knowledge you need to continue doing what works for you. But if you are like me, every event teaches you a little something. Although I've worked on Beta Convention and putting together huge events, the quilt show had its own issues.


So what did I learn? Here are a few of the big ideas.

1.  Pre-show planning: finding and comparing venues; determining a hanging system, rental costs, who and how it will be set up; scheduling both people and events; marketing; assigning people to work; etc.


2. Guild quilts alone? Our guild has 60 members, but many of them either no longer quilt or are too bashful to enter quilts in a competition. We set a goal of 30 quilts, which see may seem easy enough. Instead we were forced to have members enter two or three quilts in the show. I had four in the show but brought seven "just in case we needed them." 

A show of fewer than 30 quilts would be a disappointment to patrons, who may not return for the next show. Plan ahead for what to do should there not be enough quilts for your show. Set a deadline for entries so you will know in advance how many quilts you have. Then move to your Plan B if necessary.


3. It takes many people: to clean, to hang quilts, to take down quilts, to sell tickets, to sell raffle tickets, to work the craft booth, to organize and get everyone working. How will you get these people? Do you have a "right-hand" who can handle those jobs you can't get to? Can you plan activities around work schedules? Are there jobs for those who can't handle the heavy lifting but are still willing to help? (Two ladies helped by hand-sewing sleeves on quilts.)


4. Porta potties, water, and other services require time: determining how many you'll need, where to put them and getting permission from the owner, payment, drop off and pick up, supplies, and so on.


5. Additional events that go along with the show: in our case the town held a city-wide garage sale, the museum held a special art show, and the guild also had a craft fair. Those events were meant to draw more people into the town than the quilt show alone could. 


6. Will the show include quilt-related activities, such as trunk shows, demonstrations, Quilt of Valor etc.? Although we planned for two separate trunk shows and three demonstrations, things did not go as planned. Although six people had promised to bring quilts and to speak for five minutes, only three members participated. 


What will you do if an activity doesn't go as planned? How will you fill the time? Is there a way to make adjustments so that people who paid an entry fee will feel that they got their money's worth? Can you afford to lower entry fees? Can you find someone to step in at the last moment? To make up for the lost time, I brought in quilts for sale in my booth, which meant extra work for me and presenting without having time to prepare. 


There are other considerations that arise, of course. Certainly it's not possible to plan and prevent all problems, but thinking ahead and having many people who are able to step in and help when the problems do arrive can prevent some big issues. It's true that the best plan is to start early and plan ahead. 


Try to think about what could go wrong and how best to deal with those possibilities. While many people say that it's a negative way to look at your event, the reality is that it's actually a positive way to run your event.  Don't mix up looking at your event and running it. Those are separate ideas. 

Looking at your event means having hopes and dreams for activities--what you want other people to see
Running your event means careful planning, contingency plans, and people you can count on--what you don't want patrons to see

Thinking of them in separate terms means you and your patrons will be better able to enjoy both. What would you add to these big ideas? What problems about your own show would you like to share or discuss? Can you explain in a different way how looking at the event and running it are separate? Please add your thoughts in the comments.