Showing posts with label stippling. Show all posts

Wednesday, March 21, 2018

Billy's Memory Quilt ~~ finished!

Memory quilts seem to be the most requested commissions I get. I'm a little tired of them, but this particular quilt is really special because I made a memory quilt for this mom in 2015. That one was for her oldest;  this one is for the middle child. She brought it to me in the fall, but allowed me to push it back to get other quilts done.  

This little family has seen a few changes: mom got remarried and had a baby. That older brother started college. This one is graduating in May. And somewhere between this graduate and the baby, there's another boy. So mom was not shy about asking me to keep costs down. Somehow, I managed to keep the price down enough that it almost matches the first memory quilt I made for her back in 2014-15. 


That's me playing quilt model in the whole quilt photos. Richard's back and neck hurt too much to hold his arms overhead, so I climbed on a patio chair and did the honors. Hmm, no wonder everyone tries to hide when I come around with a quilt and my phone--quilts are heavy! 


One of my favorite parts of this quilt are the tee-shirts Billy painted. The one above is especially cute. The bottom of the shirt and both sleeves had been cut into small strips and embellished with beads. (Could there have been a girl in the vicinity?) I didn't want to lose that personal touch, so I cut off the fringes and sewed them into the quilt along the top of the shirt. They are still free to move around and really give the quilt some character.


 Another shirt must have been painted at VBS or church camp. There are lots of Christian symbols on both sides of the shirt, so I cut the front and back and stitched them together to make one panel. Then I custom quilted around the fabric paint to help make the letters and symbols stand out. 


Because mom had asked that I keep costs down as much as possible, I decided to stipple most of the quilt but just couldn't help myself on some of the shirts. This sports shirt is one example: I stitched around each of the players so that the characters stand out against the white background and to avoid cutting bodies with stitching lines. This one was great fun--I guess the only thing I didn't stitch is the background!  

Quilt Stats
Name: Billy's Tee-shirt Memory Quilt
Size: 60 x 80
Fabrics: Tee-shirts from client
Backing:  muslin (from stash)
Binding: black Kona 
Pattern: puzzle design
Quilting: stippling
Completed: March 2018

Another way that I saved on costs for mom was to put a few of the shirts on the back. The quilt is not so wide, but it's still ample enough to cover a pretty good size guy.  What do you think about my cost-saving measures? Do you have a few tricks to lower the costs for clients? I'd love to see a few that I can share with my customers. (And still make a few dollars.) 


I am committed to one more of these, then I think I'll take a break and play with my own projects. We'll see how that goes! Have a great week of quilting everyone!

Monday, December 28, 2015

Building Blocks ~~ Finished!


I've been working on two particular quilts, one for each of the granddaughters who live away.  They recently moved into separate, twin-sized beds in the same room and need quilts.  My idea was to make one quilt at a time, but quilts have their own agendas.  So I ended up making lots and lots of large, overwhelming blocks that simply could not all go into the same quilt.  


I divided up the blocks and made one quilt while the other waited its turn.  As soon as the first quilt was finished, I put it on the long-arm and got started with what I thought would be a great design, but quilts have their own agendas and again, I lost.  Instead of lots of squares that would imitate the colored blocks, I quilted some squares then added a feather design that took a life of its own. Oh well! 


When the quilt came off the long-arm, I immediately began the second top and it is now on the long-arm getting the same treatment as the first.  

But that first quilt just would not wait.  Today I cut all of the left-over focus fabric and made lots (and lots) of binding.  


I was going to cut the binding in half and add as necessary but quilts have their own agendas, and I ended up using well over half of the binding on the first quilt.  

Leaning up against the new iron, which
had the pleasure of pressing all of it.

This poor second quilt will simply have to make do, but it's been doing that all along.  (Sort of like sisters who share a room.)  We'll see what the second Building Blocks quilt will do in a few days as I hope to complete it fairly quickly.


 Of course, quilts have a way of getting done the way they want to get done, and this one has been very patient.  It didn't mind at all that I took photos of the older quilt from the long-arm.  Look there how nicely they are playing together.  


Too bad there's not enough binding for both quilts.  I really like the way this one turned out.  Plus, it's already cut and pressed and waiting for the quilt.  


 I've decided to figure out who gets which quilt when both are finished.  At that time I'll rename the quilts Building Blocks for Catherine or Building Blocks for Sophie.  I'll also add the labels to both quilts.  Hopefully they will still be playing together!

My favorite part--the feathers turning a corner!


 Linking up to

Saturday, October 13, 2012

Vintage Baby Quilt

Not so long ago a colleague brought a darling little baby quilt to me at the request of his mom.  During the summer we discussed the possibility of my repairing it for her.  After determining that her main  goal is to salvage it so that it can be used when her grandchildren visit, I suggested that we add a new backing and stipple the entire quilt on the long arm.  


I was concerned that doing so would devalue the vintage quilt, which her grandmother-in-law made many years ago.  She assured me that the important thing is that the grandchildren be able to nap under the quilt and that it last as long as possible.  She's a true believer that using quilts is a way of honoring the maker.


I agree with her, but I also like to preserve quilts for future generations and for study.  This cute quilt had been hand appliqued and hand quilted, so I wanted very much to allow the hand work to show despite the machine quilting.  

I chose to use Superior Threads' Bottom Line in light gray for both the bobbin thread and the top thread because it blends so beautifully with the off-white aged top and barely shows on the gingham appliques even though they are different pastel colors.

Unfortunately, some of the appliques are quite tattered.  I decided not to replace them because I want this to still be the grandmother's quilt and, especially, her handwork.  To compensate for these appliques, I  stippled all the appliques in a small stipple design after going around the outside edges.

The tattered appliques I treated exactly the same as those in good condition except that I was extra careful in working a tiny stipple design in the areas that are already torn and frayed.  My hope is that the extra stitches will hold the applique pieces in place for a few years longer than if they were just stitched down normally.


The only problem that this may have caused is that the quilt is a bit more stiff than I had hoped it would be, but once it's been washed a few times, it should be soft and cuddly again.

The appliques are stitched down in a blanket stitch with black embroidery thread.  Some of the details of the little animals are also embroidered with the black thread.  

Using a stipple stitch allowed me to ignore the details of the embroidery and just tack the layers together.  This leaves the embroidery floss to do its intended job and highlight the animals.

Now that the quilt is complete, I am satisfied that it will last for several more years.  The new backing and extra layer of batting helped to stabilize the top and applique.  But most importantly, the grandmother's work shines through and her entire quilt is still intact. 

The maker turned the backing to the front for her binding, which means it's only one layer of fabric and had small holes in a few spots.  To resolve this problem, I decided to use her method but instead of turning the new backing to the front of the quilt where it would show, I turned it to the middle tucked it behind the original binding.  

I stitched very close to the edge then stippled the binding on my Bernina using the BSR (stitch regulator).  This way I could add extra stitches where the holes are, the stippling matches throughout the quilt, and the binding still shows on the top of the quilt.  That the binding shows is extra important since the yellow fabric for the binding is also the fabric in the sashing.  

I don't have photos of the whole quilt because it won't be delivered till Monday and I don't want to show it until then.  But I think there are enough photos here for you to see how darling the little quilt is.  

I've decided not to put a label on this one.  It's not my quilt and while I had a part in helping the family to make sure it will be around for a while longer, I want my part to be forgotten.  Would you include a label or leave that to the family?  


Did you notice the mistake in the last photo?  Look at the whale.  It's making a flip, I guess, because it's upside down!  How wonderful is that?  To have a vintage quilt from their grandmother and for it to be so personal, handmade, and yes, signed in her hand.  Unfortunately, her signature had to be covered since it's on the back, but I will tell the owner where it is, in case she wants to include that info with the quilt.  

Saturday, September 22, 2012

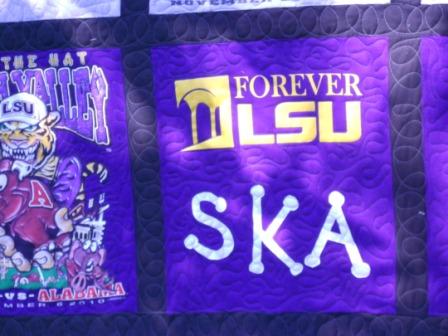
LSU is done!

Not literally, of course.  I'm talking about the LSU quilt that has kept me busy for the last few days.   While Richard watched LSU play Auburn, I finished up the purple and gold quilt.  I stepped into the house a few times, and it seems that there were as many shots of the orange Auburn stands as there were of the field.  I'd make some comment about the number of fans, then head back to the studio.  

The game is down to about three minutes left, LSU is up by 2 points, the stands are wild, and the quilt is done!  Yay for me!  In case you didn't watch the game, LSU wins the game by those two points.


I imagine that SKA will be thrilled with her quilt, but that's because I think it came out pretty great.  I had fun figuring out how to quilt all those tiger faces.  Turns out they aren't that difficult.

Of course the large open spaces were easy stippling.  And going around the LSU logo is also easy, although it does take a steady hand.  

There are a few not-so-easy Arkansas razorbacks, though, that required me to stop and figure out the best approach.  They make for a fun shirt but a slow quilting stitch.  That Mississippi State bulldog was also a bit of a challenge.  

The screen print coating on the shirts also tends to burn off the outer coating of the thread, which weakens it, so breakage is a serious problem.  I wanted to use the cotton thread, though, so I guess I rethreaded my needle, oh, 100 times.  That's not much of an exaggeration, either.  In the end, all is good.  

I didn't know what size the customer wanted, so I decided to use all 20 shirts and because they are large in size, I was able to cut them into 15 x 17 inch blocks.  Adding the two inch sashings and the quilt is a nice 68 X 98 and will fit a full size bed.


Happy quilting,
Mary

Wednesday, April 4, 2012

Small, bright, modern

The title pretty much describes my two newest quilts. The first is "Round Pegs, Square Holes" and is very colorful.  I finished it yesterday (binding and label).  
 The second one is another in the Nursery Rhymes series, "A Pocketful of Posies."  I imagine the purple squares as pockets and, of course, the flowers are posies.  I think this is number five of the series.     
The squares are deep purple and the flowers are different shades of yellow.  I quilted it with a feather motif, then stippled around the flowers up to the feathers with a small stipple.  Well, as small as I am able to stipple.  


I did a little thread painting with a yellow thread mostly to make sure the raw-edge applique will hold.  The iron-on adhesive is really thick but I don't trust it.  I trust stitches. I really don't like it because it makes the applique very stiff but I'm having some problems finding the brand I like.


What do you think?  Aren't they modern?  Do you like to make modern quilts?  How do you define modern quilts versus traditional quilts?

Saturday, September 17, 2011

Leaf Me Alone

What a sad pun in that title, but yeah, that's what I want....time to get this quilt done!  I did manage to meet my goal of loading it on the longarm.  I spent some time last night trying to figure out how to quilt this one.  

It's the first time I've made a tumbler and also the first time I've used a one-block pattern, so I figured I needed to come up with something that would look good but also not bore me to death.  Remember that I'm ADD in a bad way, so I have to think ahead.

I came up with this design but by this morning I knew it wouldn't make the cut.  First, it would be difficult to travel from one block to the next without eventually having to cross over a line, and second, I just don't think "boy" with this design.  So by the time I was up and showered, I'd decided to redraft a quilting design.  

I was jumping ahead of myself, anyway.  I still had to finish putting strips together. And let's not forget the pressing.  That took some time because the seams didn't want to cooperate.  I think it's because I included some baize, a cotton with a nubby texture and loose weave, and balzarine, which is a thin, almost gauzy cotton.  Those fabrics come from my mom's stash, although I really can't imagine what she would have done with them.  They aren't really meant for clothing and the balzarine is almost too thin for quilting.  I decided to use it anyway, since I'd promised to use some of mom's fabrics and because they happen to be just the right colors for this quilt.

In the end, I managed to get the quilt loaded on the machine and actually made a run or two of quilting.  I finally decided to include leaves, swirls and stippling.  I got pretty creative with the leaves, didn't I?  Check out that leaf right in the middle of this photo.  The one with the points.  I think it may be an oak leaf but I'm not sure.  It just happened.  In fact, my favorite leaves were mostly just happy accidents: while trying to make one leaf, I'd get mixed up and go the wrong way only to discover that it works!  Don't you just love when that happens?  What's your creativity up to today?  

And lastly, it's almost the end of the giveaway.  Midnight is the cut off, so if you haven't entered yet, you'd better click here to enter!

Happy weekend and happy quilting,
Mary

Monday, May 23, 2011

Beautiful Bed Runner continued

 I know, this is not a very creative title, but it works.  Especially since this post is a continuation of yesterday's....I had a few minutes to work on Diane's bed runner while Marley took a nap.
Thank goodness I loaded the quilt last night because it takes patience to load a quilt and I was using mine on Lil Miss Priss.  This is the first 20 minutes of her taking a nap.

Of course, eventually she did crash.  Because she didn't sleep very well last night, her morning nap lasted a good hour and half, so I did get a nice chunk of quilting done.
I started with the circle feathers that I planned to used.  Because I haven't done these in quite some time, I decided to practice on my small white board.  It's a way to increase muscle memory so that it becomes easier to move around the motif without having to think about which way to move. 
I'm definitely not a artist. In fact, you can see that I can not draw.  The idea is to get my muscles to move in the right directions while I'm thinking of what is next instead of what is happening right under the needle.  I've discovered that even thought my practices lines look pretty lame, the same lines are smoother when I "draw" them on with the machine.  

I am very good about looking ahead of the needle and, in fact, I can look ahead of the needle and a bit to either side, which allows me to anticipate how much space I'm trying to fill.  
Eventually I did get to the machine and started on those circle feathers.  The outcome is better than the white board drawing.  Isn't this going to be pretty?

I decided to leave the center of the four-patch square open so that the pretty points will stand out.  After I got a few squares stitched, I began thinking about the sashing strips.  There are a few problems with the borders being a little tight.  I decided to stitch the sashing with a medium stipple since stipples are pretty good about holding a quilt together and also quilt out some issues or problem areas.  
I got farther than I hoped today.  In fact, I got half-way through the quilting.  There are three rows of four-patch blocks and I've dropped feathers into almost two rows, plus I stippled some of the sashing.  Tomorrow I should be able to finish the feathers and and stippling.  Then I'll have only the borders left.  I hope to have the entire bed runner completed by Wednesday afternoon and ready to ship back to Diane on Thursday or Friday.  Of course, much depends on Marley's naps.