Showing posts with label die cuts. Show all posts

Friday, November 13, 2015

A box, some dies, a quilt or 2?

I received a package last week that I've not told you about.  A nice big box of Accuquilt dies!  YAY!  


It's always nice to hit a sale. And it's extra nice to have a little money squirreled away to take advantage of a sale.  Guess what.  I. Had.  Both!

Studio Double Wedding Ring-17" Finished (5-Die Set)
50007
Ordered: 1
Shipped: 1
$120.00
Studio Drunkard's Path-4 1/2" Finished
50099
Ordered: 1
Shipped: 1
$96.00
Studio Flowers Trio (Long Cut)
50437
Ordered: 1
Shipped: 1
$45.00
Studio Forget Me Not (Long Cut)
50433
Ordered: 1
Shipped: 1
$39.00
Studio Double Wedding Ring Optional Arc
50008
Ordered: 1
Shipped: 1
$24.00
Studio Super Giant Strip Cutter-3" (2 1/2" Finished) 4 Strips
50010
Ordered: 1
Shipped: 1
$96.00
Returned

But, I guess, I got a bit greedy.  I ordered one die incorrectly.  I really want a 2 1/2 inch strip die.  I also want the die to fit what I have--meaning I can't get the super giant size.  


The tray and the cutting plastics I have already are about 8 inches short. So I've returned the last item on the list, but maybe I'll be able to make another order soon.  I have started a new wishlist.  The thing is, though, I had the last wishlist for about two years.


And so, I started a new quilt top.  My purpose?  To use the Drunkard's Path die set that came in the box.  So, what to do?  I pulled the dotted fabric first, found some solids that coordinated well, and just started cutting.  


And started sewing and sewing.  The 1/4 circle takes time.  Lots of time.  It's sort of tight.  Not impossible, of course.  But tight.  And after I cut and sewed for a couple of days (meaning hours) I came to realize two things: there would not be enough fabric and the quilt was wanting something else.


So, it's slowing changing.  I've added some more solids...in pastel colors because all those primaries were getting nauseating.  Well, maybe "the Louisiana crud" (sinus issues, sore throat, upset stomach, headache, malaise) that I've been fighting is what's really nauseating me.  If all goes well (and since I slept the entire day) I'll be fit for a few stitches tomorrow and Sunday.


We'll see whether I have one too-colorful quilt or two.  It could go either way right now.

Wednesday, July 4, 2012

Happy America! and an Oops

Happy July 4th to everyone! I certainly hope you enjoyed your day and celebrated with family and friends in some fashion.  
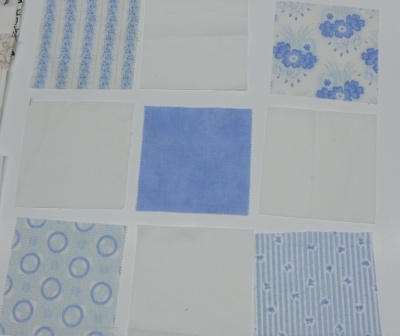
The fabrics--a charm pack with a few pieces from the stash
and a soft white to give it a calming, modern touch. 


Nine squares of fabric cut to the same size
We generally do something for the holiday, but hubby goes to work very early tomorrow, so we decided to forego the festivities and fireworks.  I did sneak into the studio for a while today and had a blast playing with the disappearing nine patch (D9P) design.  

Stitch two squares together to being forming rows
Therein lies my "oops!"  On Monday I went to the Cotton Quilters Guild meeting in Cottonport where we enjoyed a demonstration teaching the D9P.  

Stitch the third square to complete the rows
Because there were some technical issues and I am ADDX3 (meaning multiply by 3 whatever is normal for ADD), I got to "help" by holding up the design board and adding in my two cents.  Don't you know I plugged my blog and gave the wrong info?  Yea, that's how I fly.  
Stitch the rows together to form one large nine-patch block

Since I SAID I have a tutorial on the D9P, I have to make good on my word (ah, a little late, tis true).   So here we are on July 4th working on a D9P killer tut and having way too much fun!  Just need a sparkler or two and it's a whole celebration!  But the grandchildren have been returned to their rightful parents and the doors are locked.  So we'll play quietly for a change of pace.
Cut the block into four squares exactly the same size.
Fold in half and press to find the center.
I started with a charm pack of fabrics that I picked up last year and added some soft white squares that I whipped up in no time on the Accuquilt Studio cutter.  I chose to use the solids in the center with the prints in the outer corners and whites separating them.  I knew the solid and the white would be the cut pieces, and wanted them to lend a calming influence to this busy quilt. 

Twist and turn the squares and watch the nine patch disappear!

The following pics are from playing on the design wall.  First I moved or turned the small squares to form a large block, then took two photos--one of four blocks, each in a different color, then a close up of a block so you can see how I formed the pattern.  Enjoy!
Turning the small solid squares to the outside formed a windmill effect. 


Turning the small solids to the four corners formed a basic block with built-in sashing and cornerstones. 


Turning the upper left and bottom right squares so that the solid squares are to the outside and the upper right/lower left are to the inside formed my favorite block.  I'd use this setting if I were actually going to stitch up a D9P quilt, but I have more plans for this darling.  You'll have to wait, though, to find out what they are.


There's always a straight line option!  Just make rows with the small squares.  Easy peasy, quilt squeezy!


This diagonal setting had me confused, which explains why I'm not so crazy about it.....way too ADHD!  But there's a scrappy appeal to it that I could see for someone who can handle it.  I'm just not there yet. Can't you see the possibilities, though?  It's just amazing how many different settings you can come up with in just a few minutes.  I recommend that if you do use this technique, snap photos of the setting that speak to you.  You'll have a much easier time recreating the ones you like as you play and audition different setting.  

A simple nine patch, disappearing into a stunning quilt!   

Sunday, December 18, 2011

Meeting Christmas

I can't believe that I'm posting two days in a row.  It's getting more and more difficult to get to all the things I need to do.  


Today alone we went to mass, cooked lunch for the kids and grands and visited for a while.   Then I went into the studio to work on Josh's quilt, which is done, done and finished!  Yay!


Then I started on Audrey's quilt....the last one for my sister Angie.  And guess what I managed--the top is complete. 

I admit that I cheated a bit......it's almost a whole cloth quilt.  I say almost because I had to piece it.  


Audrey saw the fabric I had planned, which is this plaid from mom's stash and loved it.  "It's awesome, Aunt Mary!" were her exact words.  After we talked a bit--she told me to put her name on the quilt--I decided that I'd use the plaid and applique her name and some funky flowers.  This is one easy quilt.  The hardest part was creating the letters for her name.  


I decided to use the freezer paper method--drawing out the letters on the dull side of the paper.  After adhering fusible web to the fabric wrong side, press the waxy side of the freezer paper to the right side of the fabric.  


Cut out the letters on the lines and remove the papers.  Then place the letters onto the plaid fabric and press.


I used my Accuquilt Studio flower petals die and made as many petals as possible from one strip of fusible web.  Turns out that's 10 petals or two flowers.  


While I was placing and pressing the flowers on the quilt top, Richard was hanging new curtains in the studio.  We finally found some that I like last night while shopping.  


They are simple brown drapes that are rather thin, but I wanted them to be just heavy enough to block out the view from outside.  They have the extra large grommets across the top so that I can easily open and close them.  


The old curtains, which I kept, were hung on the two smaller windows which have the air conditioners.  They are Roman shade-type drapes that are insulated, so they can be pulled up to expose the AC or let down to cover it. 


I'll get back to Audrey's quilt tomorrow, but for tonight I needed to wrap a few gifts, and get ready for school in the morning.  All of the gifts that will go to the in-laws are wrapped and put aside for Friday.  Homework's done, and I'm down for the evening.  Here's wishing you a wonderful, safe Christmas.


Happy Quilting,
Mary

Tuesday, October 18, 2011

Oh, what fun!

Thankfully, I had an entire Sunday afternoon to play in the studio.  And......

play, I did!
This little quilt was so much fun!
Check out the 3-D flowers and vintage buttons.


Talk about easy....just cut some flowers 
and stitch them down.
Some I cut using my Accuquilt Studio cutter, 
others I hand cut.  
Can you tell the difference?


What do you think?  Is it a like 
or, ehh, not so much?

Friday, September 23, 2011

Come In and Visit

Here are a few pictures that I took of the studio last week, when it was a bit picked up.  
Since then we've added a few more things and I've made something of a mess.  Hope you enjoy.

The Studio Cutter

The Stash!

Small items for garment sewing

Thread

The cabinets that Richard recycled for me.

My Bernina 440 QE on the shelf Richard built when he built the studio.

All of my stuff on the right of the Bernina, the Juki serger, and the computer.

The rest of the crafting stuff.  These drawers are all  labeled.

A small vintage cabinet from Richard's grandmother's home.
Please take a moment to click on the Picket Fence button on the top right of the screen.  I've been getting a few votes lately and am almost 100 votes!  Yes, I'm a little excited about that.  It just shows that a few of my followers and visitors appreciate my work....and that's a sweet thing to know, indeed!

Wednesday, August 24, 2011

Blue Bird on my shoulder makes me happy

About a week or so ago, a package arrived at our back door.  Yes, Accuquilt came through!  I'd been waiting on this particular package for a while because the dies were on back order.

Three little birds and a pair of flower petals--how appropriate is that?  So, this afternoon I finally opened the plastic cover on the birdies.  I found a pretty little piece of teal blue and a soft yellow plaid.  A few minutes of pressing on some heavy Heat and Bond and we were ready for the Studio Cutter to do it magic.

And magic it was!  Check out these cute little birds.

None of these are pressed down because I haven't decided what I'm going to do with them.  I'm thinking of making a small quilt for AAQI using either these three or

a pair of love birds.  Because I love the idea of love birds, I decided to make another pair using the small birds.
What do you think?  Aren't they darling?  What would you do with either pair of love birds?  Do they need a nest or what?