Showing posts with label nine-patch. Show all posts

Wednesday, October 10, 2018

Quilting teaches me.... Simplicity

Introduction
I've been quilting for a lifetime, literally, and have come to the conclusion that we do what we love in part because it challenges us to learn. Anyone who quilts can attest to the idea of learning about fabric and supplies, blocks and backings, sewing and making. 
I'm exploring the other things that quilting teaches.

Erica's Hot Pink Girl
Simplicity is not something that may quickly come to mind when we think about quilting. After all, there are those fancy quilting motifs and, yikes!, those itty-bitty block pieces. What about this EPP business? Is there anything simple about quilting? I didn't think so.


Jack jumped over the candlestick
Well, I didn't. You know, way back when I started quilting. That first quilt was actually very simple, but I certainly didn't think so at the time. Let's fast-forward a couple of ten years. By that time I'd made many quilts, some for no reason except that I wanted to. I'd get an idea for a quilt and that quilt just had to be made. It didn't matter how difficult--I just convinced myself to study and figure it out. 

Always though, I'd come back to an easy quilt. It's a great way to quilt while my brain rests and thinks up new quilts. Funny how that works. 

The simplicity part. There are times when a simple quilt is the only way to go. Four-patches and nine-patches--straightforward, easy, controlled or scrappy...none it matters except the quilt. 


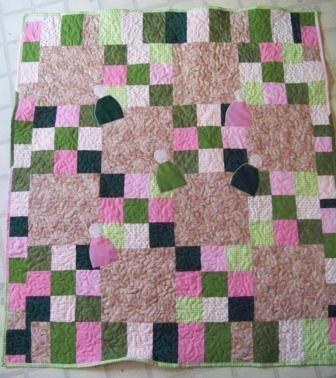
Sophie's Quilt (with 5 Babuska babies)
Simple quilts have their own kind of beauty. Those matching corners, which are okay even if they don't quite match. The straight lines and open areas. Perfect for a simple girl--one who lives in tee-shirts and flip-flops. Perfect for a new baby who just wants to be snuggled and warm. Perfect for almost anyone, almost anytime.

Don't get me wrong, I love dreaming up new ideas and creating quilts with hidden meanings. Art quilts are my current rave. But I always come back to simple. 

Quilting teaches me...

Sunday, September 30, 2018

Sunday Quilt Inspiration: N U M B E R S //past posts\\

As I was thinking of today's quilt inspiration post, I found that it's becoming quite difficult to find new ideas. I've been keeping a list of ideas for several years, but haven't added to it in quite a long time. And the ideas still on the list are pretty lame. 

Minick & Simpson: big stitch quilting of Nightingale.....

This afternoon it occurred to me that I have several posts that are popular and I could try to revisit a few of those in the hopes that inspiration would come to me soon. So the next few weeks will revisit some of the posts that have generated interest. 


"Sunday Quilt Inspiration: N U M B E R S" was a wildly popular post from 2014 that is surprisingly popular even now four years later. 

One of my favorite quilts from that post is this pretty nine-patch red and white. The maker certainly knew what to do with her needle when it came to quilting this beauty. 

Other quilts that would fit into that board today include

sternwerfer

1 patch wonder with the occasional square within the blocks 


HST block alternating with 9-patch HST block also in red and white
Martingale - Simple Joys of Quilting, The eBook   


And a few more 9-patch sort-of quilts just for fun.
Wow, you guys. This quilt has been a looooong time coming! I started writing it a few months ago, finally made time for it after the Shieldmaiden Quilt, and after a very long drive, got the picture…tamara kate origami oasis starry migration quilt
Quilt Made to Order I am now booking May 2018 as a start date Ohio Star Black and White This quilt is even more beautiful in person!! I use Kona Cotton Black and Kona cotton White for the top of the quilt and the backing. It is queen size 90”x90” The Star blocks are 13” If youPatchwork Plaid Quilt Twin Plaid Homespun Fabrics Quilt Made By Lauren Applebee Patchwork Plaid Baby Bedding Plaid Patchwork Bedding


Can you find the 9-patches?
Little Women Quilt Pattern


This is my guess. What do you think? 

Monday, January 12, 2015

Modern Cross Block

On Saturday, after playing with an idea for a block for my new quilt bee, I created a Piktochart to show how to make the block.

After creating the infographic, I thought I'd add some information and answer questions in this post. 

Question 1 is from Kelly: Do you have specific colors? Indeed, neutrals (gray, khaki, beige) for the nine-patch and bright, loud colors for the cross. 

Question 2: What is the finished size of the block? I'm not really particular about this.  As long as the squares are within the 5-6½ inch range, the blocks will be big enough for the quilt in my head.  My goal is to make several small blocks to add to the larger ones I'll get from the bee.

WHAT YOU'LL NEED:
9 squares of neutral colored fabric any size between and 6½ inch
2 strips of bright, colorful fabric at least 1½ in. X 16½ in.  
NOTE: if you choose to use 6½ inch squares, the strips will need to be closer to 20 inches

The block can end up being 13-18 inches.  That's a big range, but it's going to be fine since I have a plan.  If I seem very laid-back about this, it's because I will add a pretty, neutral background fabric to separate the blocks. This will allow me to play with the blocks and make them fit.

To help everyone out, I thought I'd add a few pictures and explanations of what I did to create the first block.  I cut and sewed 9 squares (5 in. x 5 in.) into a nine patch (3 across and 3 down).


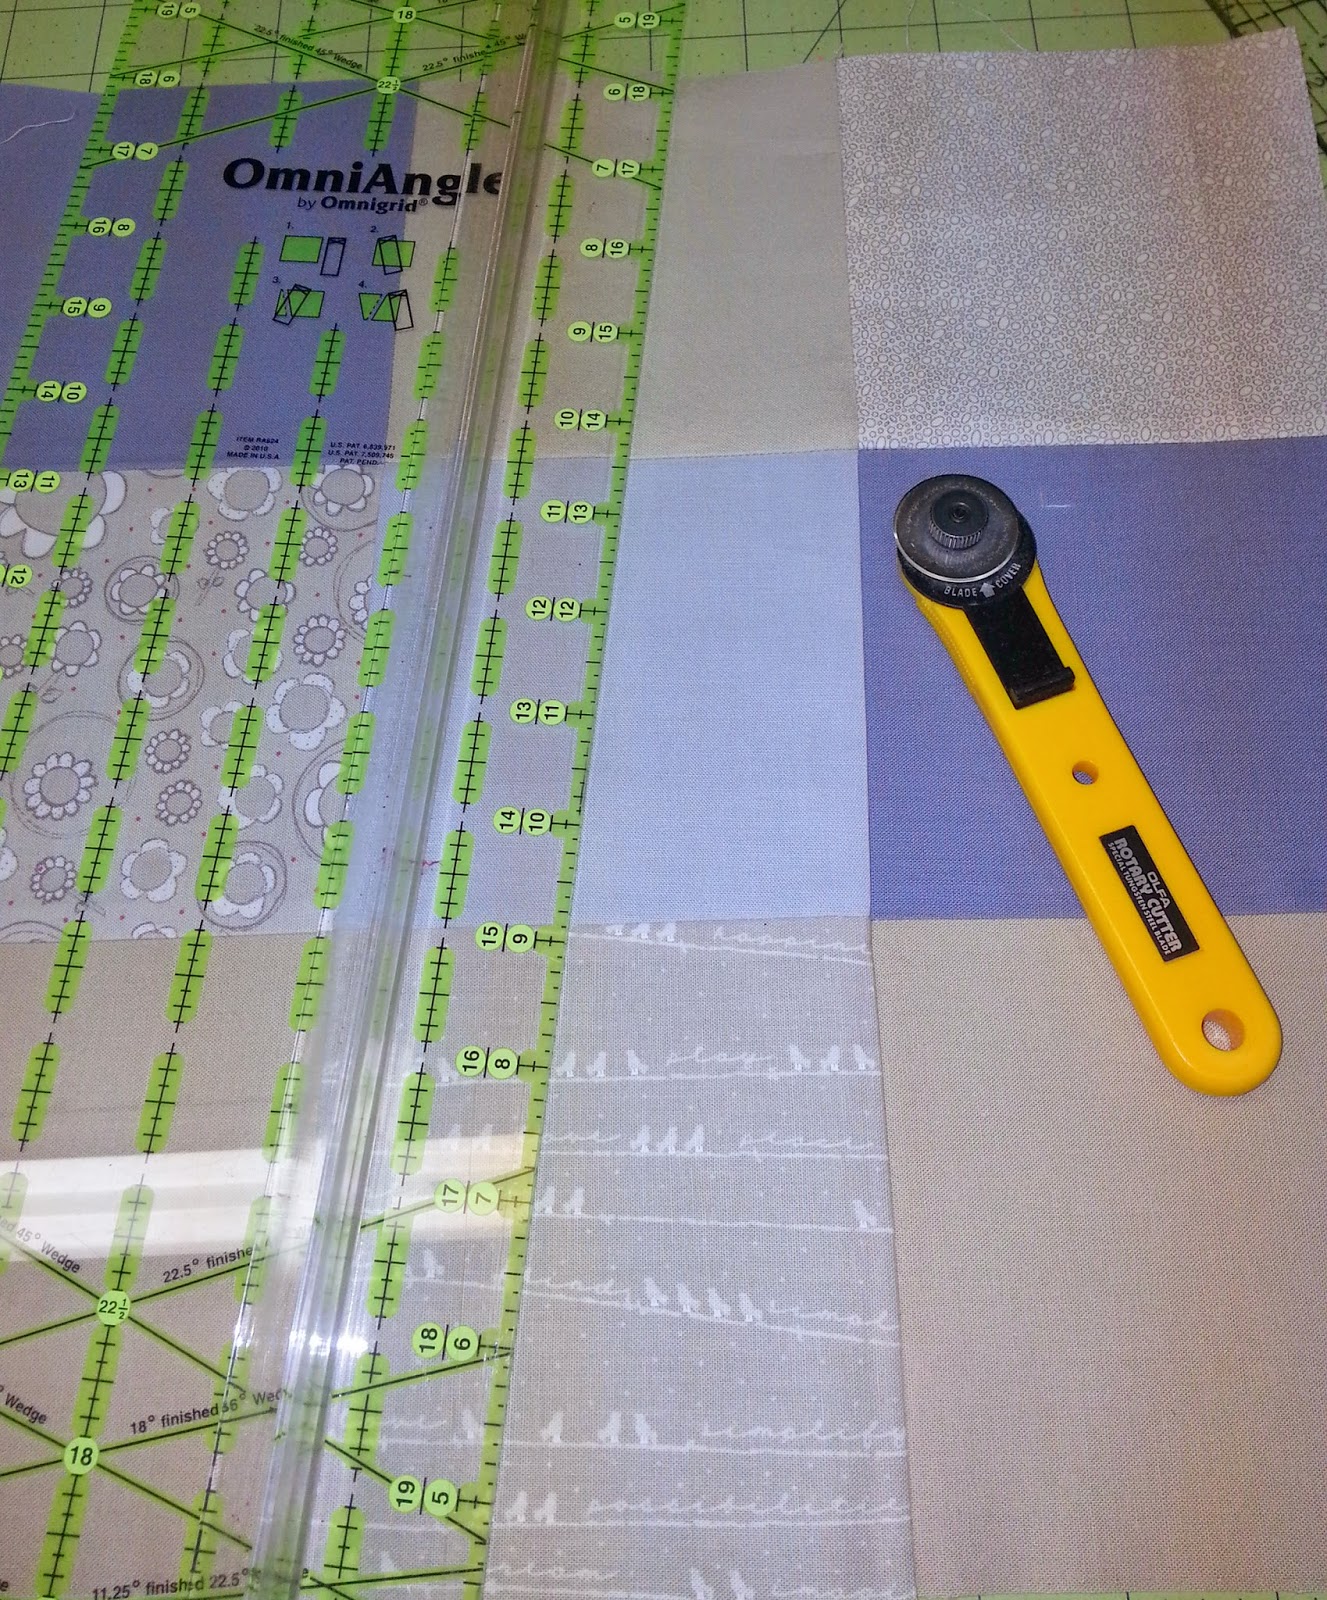
Once I pressed the nine patch really well so the seams lay flat, I used my ruler and rotary cutter to make a vertical cut (top to bottom).  The cut is angled just a little, but that doesn't matter. However, it is important to avoid getting too close to the edge of the center blocks: you do not want to have to deal with those seams when you're sewing the strips in.


I  cut a strip of very colorful, bright fabric to sew into the cut.  This strip needs to be at least 1½ inches wide and an inch longer than the block.   In my case, the strip needed to be 1½ in. X 16½ in.


First sew the strip onto one side of the block.  Know that when you place the second half of the block on the strip, the seams will not match up if there is even a slight angle in the cut.


Here's the way that I was able to line up the seams: place both pieces down on the work table face side up.  Put a straight pin in to the strip so that the head and the point both land right on the seam. Do the same with the second seam.  The pins will work as your registration marks.


Now turn the side with the strip over RST on the second side of the block.  Line up the pin with the seam of the block.  Here I've moved the top piece over just a bit so you can see what I mean.


I put two pins in for each seam...one above and one below.


The end result of the first strip--it could be better, but I decided to push on and stitch in the second.  I used the same method, except I sewed just a little slower in attempt to get everything straighter.


It worked.  I'm pretty happy with the outcome.  I'll work on a few more blocks in the next couple of weeks.  I'd like to have about three or four smaller sized blocks to go with the ones I'll be getting from my bee friends. 


I'm excited to see what the blocks will look like and to see how they will blend together with the pretty solids that I have.  I'm fairly sure one of these colors will work really well.  (They are a little lighter than they appear in this photo.)  One is a beautiful sateen that has a soft, silky feel.  I also have several fabulous grays that I can choose from, so I'll be able to find something that will work.


Monday, December 1, 2014

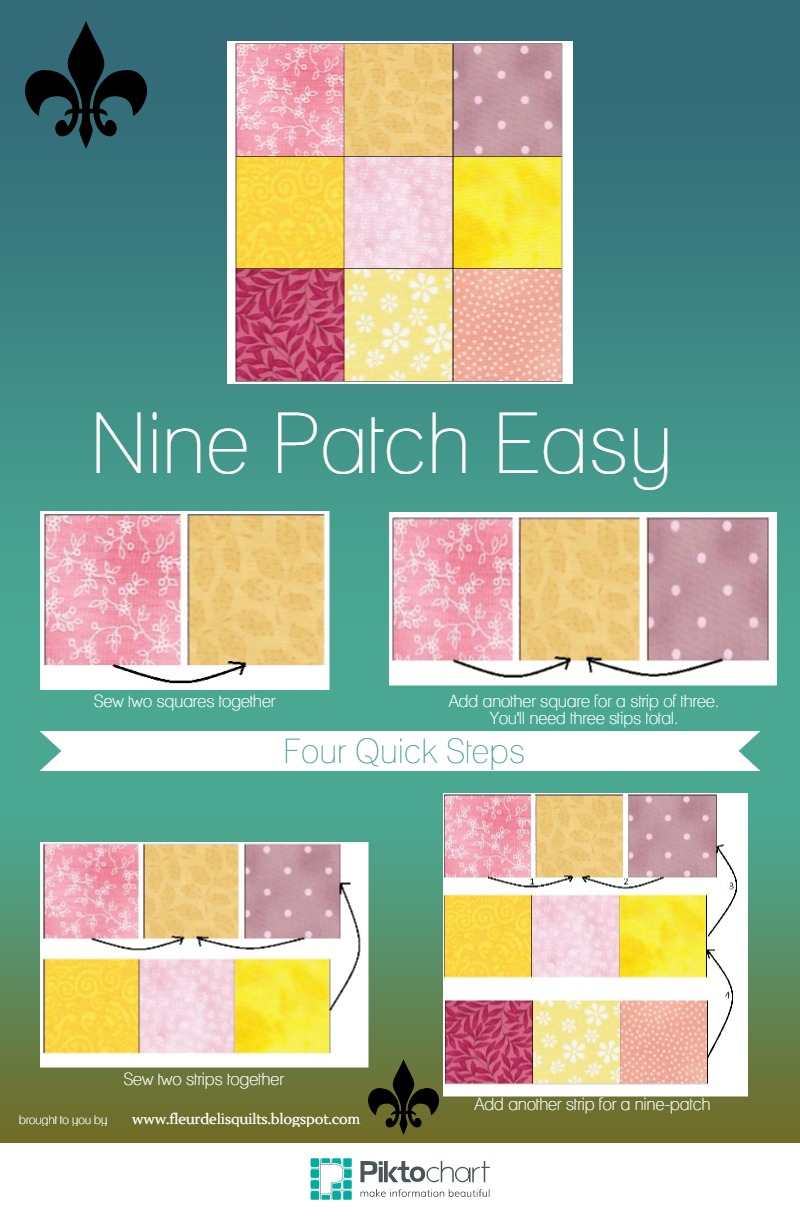
Nine Patch Easy Piktochart


And a second Piktochart, for a nine-patch block, complete.  This is fun and fairly easy.  I think I'll make a few more.  If you have a request, please let me know.  I'll gladly work on whatever you have in mind.

Sunday, February 9, 2014

Sunday Quilt Inspiration: N U M B E R S

It's ironic that most quilters are artists who love color, texture and fabric, and fear numbers.  Yet, patchwork quilting requires the use of numbers almost as much as those other elements.  Patchwork quilts are made of squares, or blocks, repeated and multiplied by rows and columns.  So quilters, who  generally fear math, must use it to be successful.  I am definitely a member of the "can't handle math" sisterhood.  It's time to appreciate numbers!  Instead of fearing them, we can appreciate the math that allows us to create beautiful works of comfort.

love this simple quilt


4  Starting easy: 
four patch


Minick & Simpson: big stitch quilting of Nightingale.....

9 A plus quilt made from nine patch blocks.

Gorgeous! blue and red log cabin quilt
24 A log cabin block with six strings per side, requiring 24 strings per block. These come together surprisingly fast despite all the pieces.

Jelly Roll Quilt – b
Rail fence blocks made with five rails.  Great way to use 2 1/2 inch strips.  Sew, cut, arrange, done! 

Lovely!  Turquoise Irish Chain by mjmarsh6  Amazing quilt love the colors and quilting
Soft Irish Chain quilt, made with nine patches paired with white squares to form the chains.  I love the beautiful quilting.  Here's the math: five pairs per row X eleven rows = 55 pairs for a total of 110 blocks.  I can almost guarantee that I'd math something wrong.

Blue quilt  4 patches.
16 This one looks difficult, but it's really not.  The 16 square blocks are made from four patches that are arranged with opposing dark and light squares.  The light squares always touch to form an inner square.  Then the big blocks are alternated with medium contrast single blocks. Easy, but dramatic.

Pinwheel
A pretty pinwheel takes only eight pieces: four half-square triangles arranged to form the pinwheels.  Gotta love that quilting!

close up, Orange Julius by Kim Buzolich at Kim's Quilts - Buzolove

Last one: a whole cloth quilt that takes only one huge piece of fabric and some talented quilting.  How cool it would be to have the ability to have this level of quilting.

Thanks for visiting.  Feel free to visit my Pinterest "Heart, quilts" board which includes all of these beautiful quilts and about 400 more!  If you'd like to join the fun and pin to this board, just say the word.  I'll gladly add you to the pinners list.

Happy Quilting, 
Mary

Friday, September 28, 2012

Nine Patch Plaid

Have you ever gotten some odd quilt idea into your head and wondered how well it would work in real life?  I do.  Pretty often, in fact.
First nine patch
 Most often the odd idea is just that--odd.  Odd enough that the outcome is tossed into the trash along with the idea.
Washed out first nine patch cut evenly into four pieces and turned
Sometimes, though, I hit pay dirt!  This week was one of those times. Which is good because I was using some nice Moda solids.  I wasn't too worried about wasting them, though, because I was cutting the pieces into large enough squares that they could be used for applique if the idea didn't work.

Second nine patch sewn
My idea stemmed from the disappearing nine patch design.  Except that I'd cut the original nine patch and add larger squares to form another nine patch.  
Thinner strips added to the second nine patch
 One cut led to getting really brave and cutting again.  This time I added thinner white strips that give a sashing feel to the top.


close up of quilt corner
Once I got to this, I liked the little quilt so much that I considered stopping.  But by the time I returned to the studio after work on Tuesday, I'd had another idea, but you'll have to wait for the next post.  It's a work in progress that is progressing slowly.  Students, papers to grade, and lesson plans tend to interrupt.  Luckily it's Friday and I have plans to spend the day in the studio, which means I can continue the experimental design.

Thursday, July 12, 2012

Fabric Addiction

That's what I'm calling my illness....a fabric addiction.  I can't seem to stop myself, although I must say I did a great job yesterday.   After all, imagine that you have the opportunity to go to a fabric shop and purchase the entire shop for one set price.  
Would you not go take a look? And, after taking a look, you see that you're getting WAY more fabric for the asking price than you'd get if you paid regular price.  The only problem is that you don't have enough for the asking price.  And the other problem is that there's lots of fabric that's, well, not usable for quilts.  What would you do then?
If you sew, you would do your very best to get as much of the "good" fabric as possible, that's exactly what you'd do.  And since I sew more than just quilts, I can use more than just quilting fabric.  I also use home dec fabrics, children's fabrics, good quality linens and silks and, well, I won't name every fabric type.  But I will say I use just about anything except the old double knit that my Ma-ma used to make her pants with.  

Remember that old heavy, hot knit that stretched in any direction and stuck to the skin not matter the season?  If your answer is "no" then you did not live during the 60's and 70's when "double de-knit" was the "in" fabric.  It was popular because it lasted forever, didn't shrink, and didn't wrinkle and came in "mod" colors.  And in the 60's and 70's every old lady who walked the earth also sewed and had a PILE of "double de-knit."  

Some of them smelled like moth balls, some like cedar and some of it just smelled like old people.  That would be the fabric but the old people smelled like their clothes.   Or their clothes smelled like them.  Either way, the smells were strong.....no, pungent....that's the word, pungent.  Whew!  I can still smell my grandmothers and aunts and every old lady I ever met as a child.  I loved those old ladies, still do in fact. But I'm not fond of "double de-knit" and I'm especially not fond of the double de-knit smells, so when I had an opportunity to buy all the knit I could ever want, I passed it up.  Yes, I did.  Perhaps I do not have a fabric addiction.  Perhaps I just simply have a passion for beautiful, natural fabrics, especially cottons.  Perhaps this story explains that truth in a simple, straightforward manner.  Perhaps not.  

However, I did walk away with three boxes of not knit and managed to pay for it, too.  The next time I have an opportunity to buy the store, I may not need to bother.  I do have lots of fabrics, after all. Yards of linen.  Piles of cottons, a full box of zippers (70+ still in the packages), thread, patterns, and my personal favorite:  this beautiful blue and gold brocade with matching buttons and thread.  Just perfect for a dressy suit!  And some people think I have an illness.....HA!

Of course, I still have fabric to sort through and put away somewhere.  That would be because I spent the rest of my day canning tomatoes--six pints and four quarts.  With onions, peppers, celery and salt in the jars, they're ready for spaghetti sauce, soups, gravy, chili, okra gumbo and anything else that could use just a little flavoring.  Already I have more put up than I had last year, so we should be good if this rain finishes off the tomato plants.  But, if we manage to squeeze a few more tomatoes into jars I'll be happy.  It turns out we like these tomatoes like salsa although it's not as flavorful.

And I almost wrapped up a quilt yesterday, as well.  I have to sew on the label, but I don't have a name for the quilt.  Here's a photo.  I could use some ideas if you have any to share.  It's my version of D9P with a quirky twist, quite modern, and quilted in a square motif.  See why I'm stuck?

Wednesday, July 4, 2012

Happy America! and an Oops

Happy July 4th to everyone! I certainly hope you enjoyed your day and celebrated with family and friends in some fashion.  
The fabrics--a charm pack with a few pieces from the stash
and a soft white to give it a calming, modern touch. 


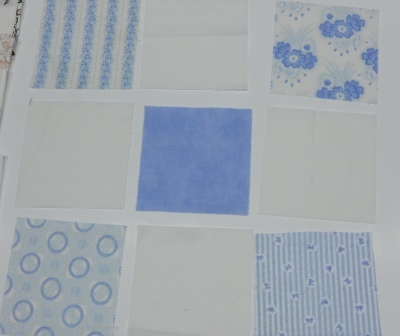
Nine squares of fabric cut to the same size
We generally do something for the holiday, but hubby goes to work very early tomorrow, so we decided to forego the festivities and fireworks.  I did sneak into the studio for a while today and had a blast playing with the disappearing nine patch (D9P) design.  

Stitch two squares together to being forming rows
Therein lies my "oops!"  On Monday I went to the Cotton Quilters Guild meeting in Cottonport where we enjoyed a demonstration teaching the D9P.  

Stitch the third square to complete the rows
Because there were some technical issues and I am ADDX3 (meaning multiply by 3 whatever is normal for ADD), I got to "help" by holding up the design board and adding in my two cents.  Don't you know I plugged my blog and gave the wrong info?  Yea, that's how I fly.  
Stitch the rows together to form one large nine-patch block

Since I SAID I have a tutorial on the D9P, I have to make good on my word (ah, a little late, tis true).   So here we are on July 4th working on a D9P killer tut and having way too much fun!  Just need a sparkler or two and it's a whole celebration!  But the grandchildren have been returned to their rightful parents and the doors are locked.  So we'll play quietly for a change of pace.
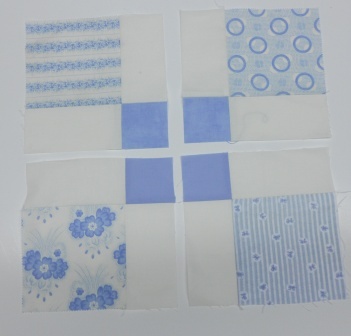
Cut the block into four squares exactly the same size.
Fold in half and press to find the center.
I started with a charm pack of fabrics that I picked up last year and added some soft white squares that I whipped up in no time on the Accuquilt Studio cutter.  I chose to use the solids in the center with the prints in the outer corners and whites separating them.  I knew the solid and the white would be the cut pieces, and wanted them to lend a calming influence to this busy quilt. 

Twist and turn the squares and watch the nine patch disappear!

The following pics are from playing on the design wall.  First I moved or turned the small squares to form a large block, then took two photos--one of four blocks, each in a different color, then a close up of a block so you can see how I formed the pattern.  Enjoy!
Turning the small solid squares to the outside formed a windmill effect. 


Turning the small solids to the four corners formed a basic block with built-in sashing and cornerstones. 


Turning the upper left and bottom right squares so that the solid squares are to the outside and the upper right/lower left are to the inside formed my favorite block.  I'd use this setting if I were actually going to stitch up a D9P quilt, but I have more plans for this darling.  You'll have to wait, though, to find out what they are.


There's always a straight line option!  Just make rows with the small squares.  Easy peasy, quilt squeezy!


This diagonal setting had me confused, which explains why I'm not so crazy about it.....way too ADHD!  But there's a scrappy appeal to it that I could see for someone who can handle it.  I'm just not there yet. Can't you see the possibilities, though?  It's just amazing how many different settings you can come up with in just a few minutes.  I recommend that if you do use this technique, snap photos of the setting that speak to you.  You'll have a much easier time recreating the ones you like as you play and audition different setting.  

A simple nine patch, disappearing into a stunning quilt!