
 |
| The fabrics--a charm pack with a few pieces from the stash and a soft white to give it a calming, modern touch. |
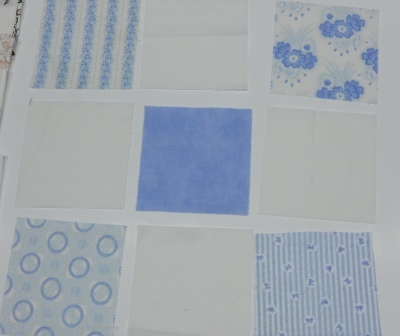 |
| Nine squares of fabric cut to the same size |
 |
| Stitch two squares together to being forming rows |
Therein lies my "oops!" On Monday I went to the Cotton Quilters Guild meeting in Cottonport where we enjoyed a demonstration teaching the D9P.
 |
| Stitch the third square to complete the rows |
Because there were some technical issues and I am ADDX3 (meaning multiply by 3 whatever is normal for ADD), I got to "help" by holding up the design board and adding in my two cents. Don't you know I plugged my blog and gave the wrong info? Yea, that's how I fly.
 |
| Stitch the rows together to form one large nine-patch block |
Since I SAID I have a tutorial on the D9P, I have to make good on my word (ah, a little late, tis true). So here we are on July 4th working on a D9P killer tut and having way too much fun! Just need a sparkler or two and it's a whole celebration! But the grandchildren have been returned to their rightful parents and the doors are locked. So we'll play quietly for a change of pace.
 |
| Cut the block into four squares exactly the same size. Fold in half and press to find the center. |
 |
| Twist and turn the squares and watch the nine patch disappear! |
The following pics are from playing on the design wall. First I moved or turned the small squares to form a large block, then took two photos--one of four blocks, each in a different color, then a close up of a block so you can see how I formed the pattern. Enjoy!

Turning the small solid squares to the outside formed a windmill effect.


Turning the small solids to the four corners formed a basic block with built-in sashing and cornerstones.


Turning the upper left and bottom right squares so that the solid squares are to the outside and the upper right/lower left are to the inside formed my favorite block. I'd use this setting if I were actually going to stitch up a D9P quilt, but I have more plans for this darling. You'll have to wait, though, to find out what they are.


There's always a straight line option! Just make rows with the small squares. Easy peasy, quilt squeezy!

This diagonal setting had me confused, which explains why I'm not so crazy about it.....way too ADHD! But there's a scrappy appeal to it that I could see for someone who can handle it. I'm just not there yet. Can't you see the possibilities, though? It's just amazing how many different settings you can come up with in just a few minutes. I recommend that if you do use this technique, snap photos of the setting that speak to you. You'll have a much easier time recreating the ones you like as you play and audition different setting.
A simple nine patch, disappearing into a stunning quilt!
No comments:
Post a Comment