Showing posts with label pin cushions. Show all posts

Saturday, March 31, 2018

More Pincushion Finishes

Somehow I'm going to have to keep track of which pincushions I've shown you and which ones I have left. I decided to show you in batches since that's how I'm making them. Plus, each batch kind of has a theme or colorway. Maybe it's more a colorway.
I wrote about the first batch here.

I'm sewing ahead of my writing because for some strange reason that's how it's going. Don't read too much in it though, I'm not that far ahead with the sewing. 

In the second batch, (here) I used an off-white background fabric. In that post I wrote about my plan for all the pincushions. For these I found a piece of Kona Black in the scrap bucket. It was big enough to cut down, which I needed to do because the other scraps were more like slivers. 


I decided not to spend much time agonizing over what the pincushions would look like. My plan is to let people choose their own, so if someone doesn't like a color or whatever, she can choose another. Or none at all. 


I like the black on these but I really like the tight quilting on the topmost in this picture. I've tried this checkerboard quilting on a few other pincushions since, and it always ends up being one of my favorite motifs. Too bad it's so time-consuming.


Of the pincushions themselves, the orange with the thin sliver of black in the middle is my favorite. I don't even know why. I'm fairly sure the purple and gold LSU colorway is going to go quickly, so I've been trying to include one or two in each batch. 

I do not like the wavy quilting (it looks messy) but there's no way I'm ripping out some quilting on a pincushion. If everyone says it's too messy, I'll toss it away. 

And there you have it....four more pincushions in an afternoon of sewing. 


Saturday, May 13, 2017

Pincushion Finishes

Several weeks ago I was making plans to go to my quilt retreat in Fountainbleu State Park. We discussed and decided to each bring a small something to the other retreaters. I made the quilted containers from scraps, but I felt that they really weren't much and decided to add a pincushion to the containers. Since I've been keeping the pincushion sort of secret, I thought I'd show some of the ones that made. 


At first I thought I'd bring each person one of the square pincushions like these below, but after seeing just how many I had made, I decided instead to bring them each one square and one rectangle. 


My idea was that they would have one for the work table and one for right in front of their machines.


I honestly can't say which of the two shapes they liked more, but I can say that they seemed especially happy with their little gifts. I'll have to write a post about the items that they gave later in the week. I was absolutely thrilled with everything that I received. In fact, I used two gifts before leaving the retreat and made plans for one other gift while I drove home.


 A special thanks to Amanda Jean Nyberg for her wonderful idea of keeping the completed pincushions in a pretty basket, ready to go to their new owners at a moments notice.


This is a before picture of the basket. An after picture would be a picture of an empty basket...nothing to see there so no photo.

What do you think of giving a quilter yet another pincushion to add to her collection? Is it a good gift or just repeating the obvious?


Linking up with

Friday, January 24, 2014

Snow Day to Play Day

It's nice to get a day off now and again.  Today's day off was a nice surprise that I decided to take advantage of.  I did a little cleaning, a little sewing and a little playing.  


 I found this small Grandmother's Flower Garden piece at my mom's a couple of days ago.  The moment I saw it, I decided to make a pin cushion with it. 


Although I thought I'd gotten all the fabric at my mom's house, I discovered another chest of drawers in a different bedroom.  Full of fabric.  Mostly cotton.  Kinda cheap.  Very thin.  Walmart fabric.  But in the midst of it all was this cute little piece and I could not leave it behind.  Well. I couldn't leave most of it behind.  I hauled a small box home.  Then Rich went back and got the chest of drawers.  


I appliqued it to two pieces of white muslin using a blind hem stitch.  I made a pincushion last year that already is beginning to come apart from the pins, so I've learned that I need to double the fabric. 


I really like it.  Isn't it pretty?  It was fun to make, especially at the end when I added the crewel cotton to help hold it's shape and add a fun touch.  I had to use an extra long crewel needle so it would reach through the pincushion.  It is a sweet reminder of my mom and grandmother so I'm happy that I made it.

Happy Quilting,
Mary

Tuesday, October 23, 2012

Quick and easy goes it

Things have been a little quiet around here.  After the whirlwind of rushing through the last quilt project, I wanted to rest.  Not that any of the last three or four quilts have been difficult, of course; they were just rushed.  

Add to that the stress of working full time, trying to learn several computer programs for school, and keeping up with a library, and I just needed some down time.  

To that end, I found two simple, easy little projects.  The pincushion I saw on Pinterest some time ago.  I didn't have a pattern, but that was easy enough.  I simply cut out a heart shape!  I wanted to make this pincushion only because I had this cute heart fabric.  

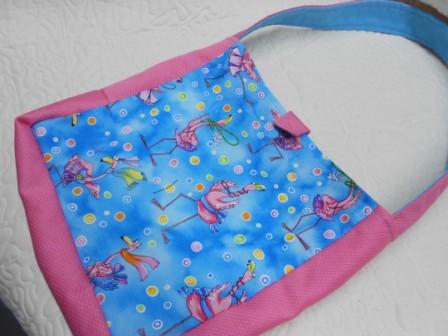
 The little bag I made with Dusti in mind.  It turns out that she really doesn't want it.  She doesn't carry a bag or purse and felt that it would just be something else cluttering up her room.  Imagine a 13-year-old saying that!  

I was surprised but not terribly.  Still, the bag is really cute, so I think I'll give it to someone else around Christmas.  Surely at a school of 400+ I can find someone who would like it.


I made the bag, like the pincushion, because of the  fabric.  While digging around in my stash, I discovered the pink flamingos, then found a solid pink to coordinate, and zipped up the bag in about two minutes.  Those flamingos were wiggling and dancing in an effort to get my attention and convince me to do something with them!
The bag is small and the handle is short so that it fits close to the body when worn on the shoulder or can be worn on the arm.

I put in a small Velcro closure for the top.  I think it will work well for carrying around small electronics and such, though I didn't intend it for that.

What are yo working on?  Any small projects on your "to do" list?

Wednesday, September 5, 2012

October Guild Fun

On Monday the Cotton Quilters Guild held it's monthly meeting and, because it was Labor Day, I was able to attend.  Generally I miss out once school begins, so this was a definite treat for me.  


We have several ladies who are also members of the Patience Quilters Guild in Alexandria, and one of them had a large container of finger pin cushions and several wrist pin cushions.  I didn't even bother with trying on the finger ones: I am very sure that I would be distracted by it.  I did find a wrist one that I liked, and at 50 cents, it was quickly mine. 

There were all manner of items on the agenda, but I was a late arrival and had to sit in the back, which means that I couldn't tell you half of what happened.  

There was some discussion of attending the Houston Quilt Festival, but because the majority wants to go during the week, I'll be working.  

In September our guild will have its own show at the museum, and I have plans to enter the quilts I've made in the last year.  I volunteered to help in whatever way the guild needs on the Saturday of the show.  Donna has asked that I be in charge of the silent auction.  That should be fun!  I'll make or donate a small quilt to add to those already donated.  

There's always a great time of show and tell.  I added my name to the list and showed the two small table runners that I made for the church fair--great way to get a plug in for the church fair-- this Christmas runner and the fall one that I wrote about here.  

The Christmas table runner is a fun, easy project that gave me a great opportunity to use the specialty stitches on my Bernina.  I used them to decorate the ornaments.  Definitely give it a try if you want to play with your stitches.  Do take a little more time with the zigzag applique stitches so they're more even than mine!  I didn't the fusible that I normally use, so the appliques moved around and gave me fits.

As usual we had wonderful refreshments of cakes and drinks and some time to visit and chat with friends.  As we were getting ready to leave, I took a look at all the items that have been donated for the show booth.  The money that is raised will be used for a variety of things.  

I noticed this pretty little quilt top on the table and offered to quilt it, thinking that more people would be interested in purchasing a completed quilt.  


Today while we were in Alexandria, I picked up enough yardage of an off-white flannel for the back.  The top is made of a cheater panel and two borders.

I was hoping to find a burgundy flannel to match the "sashing" between the prints.  I did find a pretty green, but it also did not match correctly.  Rich found the off-white and it's almost a perfect match.  Hopefully tomorrow I'll have time to piece the backing and load it on the long arm.

After our doctors' appointments, several stops to run errands, and a shopping spree to Sam's, we ran in to Hancock's Fabrics for some muslin while it's on sale.  I found a nice bolt of about 12 yards. 

Saturday, September 10, 2011

National Sewing Month Giveaway

Let's celebrate National Sewing Month together and have some fun, too!  I'm using rafflecopter.com to help with this one.  It's oh, so easy!  Tell rafflecopter the details and just let it do the work.  Whew!  What a relief.

And the best part?  Now I can get back to the studio, but before I do, I promised rafflecopter that I'd list the stuff you get in one of my sewing repair kits.  Surely I have time for that!

Sewing kit includes
**two yards each black, white, khaki thread
**needles
**buttons (3 black, 3 white of various sizes/styles)
**safety pins (different sizes)
**straight pins

Tuesday, July 12, 2011

Pincushion and Storage Container

Pincushion and Storage Container   
This pincushion and storage container is meant to hold all the straight pins that you're using and those you're not.  Simply open the jar lid and drop the extras in.  When you run short or need a few extra pins, they are conveniently close at hand.  

To begin, you will need the following:
a wide mouth jar with two piece lid, scissors, pencil or marker, fabric scraps, batting scraps, cardboard (for template), hot glue gun and glue.

Start off by making a template using the lid to draw a circle on the cardboard and cut it out.

Place the template on your batting and cut around the cardboard.  Repeat to cut four round pieces of batting.  (Note that they do not need to be perfectly round.)  Keep the cut off pieces of batting.  We'll use those first.


Using the cardboard template, cut one fabric circle bottom.  I used coordinating fabric to match the print I used for the pincushion, but you can use the same fabric for both the top and the bottom.


Use a bowl or saucer as a template to mark a circle about twice the size of your lid--it is not necessary to stress over the size, just make sure it's fairly large in comparison.  Mark your circle and cut it out.  Thread your needle with about 18 inches of thread.  You will need to make a knot at both ends of the thread so that it will be a double strand.

On the wrong side of your fabric, fold the raw edge down 1/4 inch and begin your stitches.  You will make a continuous running stitch completely around the fabric circle folding the edge down and working the needle in and out of the fabric.  This is exactly like making a fabric yo-yo, except do not pull the thread tightly just yet. Set aside for a few minutes.
 Use the hot glue gun to put several lines of glue on the top of the metal lid and put some of the scrap batting pieces you cut off the circle on top of the glue.

Stack the batting circles together and put on top of the scrap pieces.  You'll have to hold the batting down and place the wrong side of the fabric yo-yo down on top.  

Slide the sewn edges around to the back of the metal lid and pull the thread tightly to draw up the fabric.  Knot the thread and cut.  


Use the glue gun again to drop a bead of glue around the edge of the fabric circle and carefully cover the bottom of the lid with the smaller piece of fabric.

Now you can pop the covered lid into the ring.
Screwing the lid onto the jar is tricky at first, but once it's on and left for a few days, it gets easier.  Tighten the lid well so it smashes the fabrics.

And your storage container is ready for use!

An idea for those who do not sew much but are able to repair clothing and such is to put all your supplies in one convenient place.  The jar can hold several small spools of thread, safety pins, needles, buttons and so on, while the pincushion can conveniently hold the pins and needles while you are working on a project.  The wide mouth lid allows for easy access to the items in storage.  Makes for a good gift1