A new project
I've been meaning to work on a new quilt idea that's been cooking in my head for quite a long while. This morning Richard and I ran to town for a minute and I picked up several 1/4 yard pieces of brown fabrics for my new project.
 |
| printed photograph |
So what is this new project, you ask? I'm making a barn quilt. My niece took a photograph of my parents' old barn, and I'm using it to create a quilt.
I haven't gotten very far, but I'll share what I do have and my process. I started with the photograph, of course. I printed it on a regular 8 1/2 by 10 sheet of copy paper in black and white.
 |
| transparency |
I traced the most important elements onto a sheet of transparency plastic. I have an overhead projector at home from teaching years ago. It's obsolete at Bunkie New Tech High School, which has a SMART board in every classroom, but at Fleur de Lis Quilts, it's a wonderful piece of equipment. I like to tape the transparency down to the projector so it doesn't move.
 |
| paper pattern |
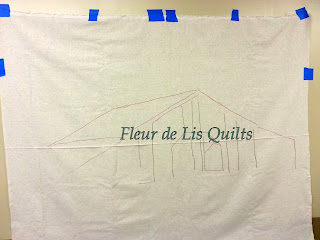
From there, it's just a matter of using painter's tape to tape a large sheet of paper to the wall and trace the pattern. Then do the same thing with a piece of muslin. Remember that the muslin needs to be at least 8-10 inches longer and wider than the highest and widest part of the picture to be able to load the quilt on the long arm.
On the paper I traced many of the details. Then I labeled the parts so that when I cut the pattern apart, I could easily put it back together.
 |
| close-up of pattern |
On the muslin I only blocked out the larger elements of the barn--not the trees or the details. This is so that I can put the fabric pieces in the correct places. The muslin is the background of the quilt picture and gives me something to press the applique pieces to.
 |
| muslin backing |
I use iron-on fusible web and keep a couple of different brands. I do not like the heavy plastic-like stuff that comes pre-packaged. It holds forever, but sewing over it is almost impossible. Heat n Bond lite works well for me, but I've used other brands that worked well.
 |
| close-up of muslin |
I put the muslin on my ironing board and cut my pattern pieces there also. Once I have a couple of pieces cut--and sometimes I have to cut the same piece a couple of times--I press them in place.
It's a slow process because I have to audition fabrics as I go. I pulled all the solid browns that I have in the stash, but I started with the roof and that needed a mottled rust/brown. I finally settled on this for the tin roof, but that was after eliminating at least 10 pieces first. Everything felt too dark or too light or not rusty enough. I'm not even sure about this piece but I'm hopeful.
I'm fairly pleased with my progress so far. There's still much left to do: finish the barn, add grass, trees, and sky and, of course, quilting. I have plans for thread painting the entire piece to add dimension, color and detail. It will be a while before that comes. Please tell me what you think and drop a suggestion or two if you have any. I'd love to get some feedback on this one.


1 comment:
OMG,this is simply amazing! Are you using something like steam a seam to adhere the browns to the muslin? I have never heard of thread painting?
Thanks for stopping by my blog today :)
Post a Comment