Showing posts with label link party. Show all posts

Saturday, September 22, 2018

Bipolar 4: Connection {an art quilt series} finished!


If you've been following my blog for a while, you know that I have Bipolar Disorder and that I've been trying to work through the emotions and problems of the disease. An art quilt series seemed appropriate for the task, so I started one back in May or June. Because I decided to hand quilt the first couple of quilts and machine quilt others, I am finishing them in a bipolar sort of order. Well, what did anyone expect?


This is number four, Connection, in the series. As I go along I'm researching ways to overcome the many challenges of Bipolar 1. It's not easy to keep up with them all. But this is giving me time to think, pray and meditate about living with a disease that will never be cured. One of the reasons that it's become such a big issue is that since I've retired, I begun sharing this information with others.


My family has known for a few years. I told Richard the day that I received the diagnosis. But I. I have always known that there is something different in my system. I figured out part of the puzzle when I finally saw a doctor and began taking antidepressants. But even the meds didn't "fix" everything.


Eventually I got the diagnosis and received medicine specifically suited for BD. I've researched the symptoms, the medicines, therapies, and so on. Even so, everyday seems to bring something new. 

Now I'm trying to include some of the strategies that have worked for others. That's how I've gotten here. And hopefully it will lead me forward.   


Look for other quilts in the series here:

Bipolar  {an art quilt series} 


And, visit the Bloggers Quilt Festival at Amy's Creative Side to post your own quilt finish--but hurry because it ends tomorrow. Want some inspiration? There are over 150 blogs posted thus far! 


Thursday, October 6, 2016

Pin It Weekly #173

quilt:

img_0270.jpg (1536×2048):

IMG_7102.JPG (1600×1200):

LOVE this wall: Wood Island #Lighthouse - #Maine http://dennisharper.lnf.com/:


Beautiful Vintage Milk Glass Hobnail Table Dresser Lamp. $29.00, via Etsy.:

That's what I've been pinning lately, but there are many others who are pinning, too. For example, Miki Orengo has been pinning inspirational quotes:

dance gifts ideas https://www.gearbubble.com/gbstore/dancingfun: No matter what never forget to smile, Here are Inspirational quotes about smile that will help you smile and be happy more often:
 :
Brenda Gossett has a board titled "Sew u say?" that has all manner of stitches, patterns and ideas.

Szablon do pobrania, free sewing pattern.:

Fleur de Lis Alphabet- A: Sonia Showalter:

Sample Books. Love the blanket-stitched edges.:

Renee Smith has a quilt board with 144 pins. 

Urban quilt:

modern quilt - Google Search:

canvas, use masking tape to do pattern, splatter different colors of pink for Ashton:

What have you been pinning lately? 


Friday, September 2, 2016

More studio cleaning


You know how yesterday I wrote about my messy worktable? Well, I returned to the clean-up today and advanced a little bit.


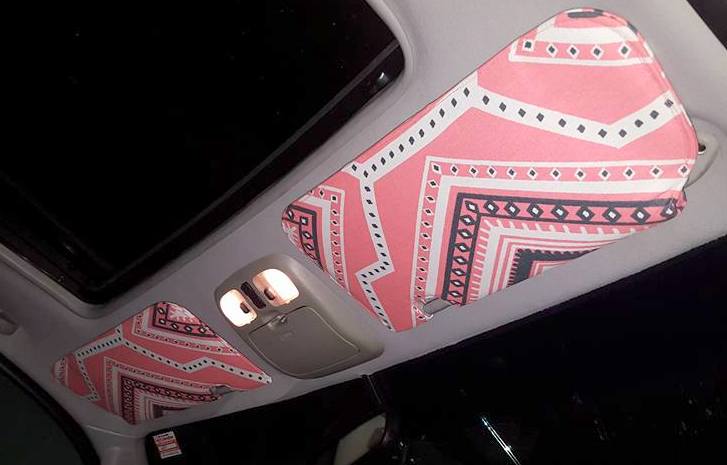
The small project on the left is an organizer for Dusti's car. I cut it out from the leftover fabric that we used when we updated her sun visors so it will match. I intend to put a strap on it so that she can hang it on the back of the seat.  I'll use Velcro as a fastener so she will have some choices in where and how she uses it.


In another spot I had two tops that needed altering for a friend. They were advanced to the front of the line and are now complete. In fact, I put them in the car to return on Tuesday. I just needed to shorten the bottoms and sleeves.  Done and done.


Wow! I should have gotten to this cleaning business sooner! Somehow it all ran smoothly and quickly. So I folded some fat quarters and put those away. Tomorrow I plan to tackle the big pieces of fabric that I'd pulled for the last few quilt projects. That will take more time, but then I'll be able to see across to the other side of the table. I haven't able to do that in a while!

Finally I'll figure out what to do with those items that don't really have a home. That's always a difficult decision for me. My studio is full, so finding a space for new stuff is not easy. Plus, I tend to forget where I've put things, so I need to reason through the process.  

And then I'll be ready to get that big quilt finished! Wasn't that the goal at the beginning?

I'm linking up some of my recent finishes with Crazy Mom Quilts. Now that Amanda Jean is back from her 
mini-vacay, there will be lots of blogs to catch up with.

Tuesday, August 16, 2016

On Sun Visors and Granddaughters ~~ an odd finish!


Dusti: Grandmay, can you please sew my sun visor?
Me: What?
Dusti: Sew my sun visor on my car.
Me: What?
Dusti: We are fixing my car and Dad took the visor off. And I want to cover it with fabric, but I need you to sew it.
Me: When? What? Now? 
Dusti: Dad is leaving to go to work and he's going to put the visors back on the car tonight.
Me: Really? Now? 
Dusti: But Grandmay, it's going to be so pretty. I got really pretty fabric, but I need you to sew it.
Me: Tonight? Now? Oh, come on. This is crazy. Come on.


visors in up position

visors in down position

So now it's 9 p.m. and I've just sent them on their way, two newly recovered sun visors done and supper included.  So, yes, we paid them for the pleasure of doing them a crazy favor.  Is it any wonder that they come up with this kind of insanity?  Well, honestly, Pinterest does not help my cause.


view showing the door panels and visors (with mirrors open and lit)
Will (dad) removed the visors and took them apart. Then I used one visor as a pattern cutting around the visor with a good inch extra to fold over. 


Once the fabric was cut out, Will and I pinned it around the visors to hold it in place. I had to sew the part that was cut out for the mirror first. There's also a bar that hooks to a plastic piece on the ceiling so the visor will stay in place. The visor has another hole for this bar, so I sewed around that section. 


the door panels on the driver's side
The fabric covers cardboard, and I sewed around the outside of the cardboard so the fabric would stay in place and be easier to handle. Then Will put all the parts back together: the bar that holds the visor in place and the lighted mirror plus its wires. The fabric covered cardboard folds around these parts, and I sewed another seam to keep it closed. 


Check out that happy smile! Actually, I wasn't as cranky as I felt, and the job wasn't as difficult as I expected. And now I'll admit that it was interesting to see how it would work. 

UPDATE 8-17-16: A couple of people asked for directions, so look in my response to Preeti for a breakdown of the steps. Now I wish I'd taken photos of the process!
All photos taken inside the car are from Will (Dusti's dad).

One more project for the Ford Escape--see it here.


Linking up with these blogs--go visit and see what others are working on / finishing up.

Thursday, July 7, 2016

Pretty Maids All in a Row ~~ Finished!

One of the kits that I put together to sew while we were on vacation is this set of pink bricks. It was easy, straight-forward sewing with no thinking necessary: sew two together until all the pairs were done; then sew up the pairs and so on until all the columns were finished. Press and sew the columns together and in no time I had a quilt top folded and put away in my "sewing room" cubby in the camper. 


I think I enjoyed sewing this quilt top precisely because it was so easy. Who wants to work on a difficult quilt while unwinding, right? I think that there are enough variety that I didn't worry about whether the same fabrics were close to each other. 


 The quilt is very pink, perfect for a girly, girl, so I quilted it with an all over feather motif. Where the feathers didn't quite meet, I added some pebbles. And that's it!


Kept it very simple and easy. Can you see the feathers? They are pretty big, but I wanted to cover lots of space so that the quilt will be soft and cuddly. 


 A couple of new teachers at work are expecting babies or just had a baby! So I thought I'd replenish the pile of baby quilts that I've already begun to give away. 


Quilt Stats
Name
Pretty Maids All in a Row
Size
41" x 42"
Fabrics
Scrap fabrics—pinks (entirely from scraps/stash)
Backing
Stash fabrics in gray
Binding
Moda light pink from stash
Pattern
2½  X 5 bricks
Quilting
Free motion feathers with pebbling 
between feathers 
Completed
June 2016


Linking up with
Needle and Thread Thursday at My Quilt Infatuation
Amanda Jean at Crazy Mom Quilts
Can I Get a Whoop Whoop at Confessions of a Fabric Addict
Sew Cute Tuesday at Blossom Heart Quilts

Monday, December 28, 2015

Pin It Weekly #134

It's almost January--when we try to up our game on cleaning and organizing.  Already I've been thinking about some of the stuff that needs attention.  Namely scraps of fabric, bits of ribbon, bobs of thread, you name it!  If there's a bit, no matter how bitty, I tend to want to hang on to it.  So, I've been pinning ways to store those itsy bitsy, teeny tiny, bits and bobs.  Here are just a few.  

Scrap storage ~~ 
organize your ribbons

Ribbon storage!  tinkartist.blogspot.com  #ribbon

Cartonnage - Où l'on révise ses… - Mes débuts en… - Récolte - Rose comme une boîte - Petit panier vintage - Mise en boîte - Tempus fugit

So going to do this with my "left over" yarn. Also poke a small hole in lid to feed the yarn up through! Prob paint the carton too.

How to store scraps...this is a great idea. I like that it is visible without pulling open doors or pulling out bins. Its just right there when you open the door to the closet...you know, in my pretend sewing room. :)

Scrap storage | Mermaid Sews - Gosh, my scraps don't look this good.

Project storage.....this lady has great ideas for breaking up your stash so you can use it! Many free patterns using her  technique!!!!!  I am getting started!:

Scrap storage bins I made using, what else, scraps!  To add to the fun factor, I quilted different motifs on the negative space for each bin. www.fleurdelisquilts.blogspot.com
This one is the storage system I use.
Read about it here.
Scrap usage ~~
Textile Treasure Seeker: 'Thread and Thrift' this would make a nice storage bag for small extras in the closet, ive done this with pretty used dresses

Flower Scrap Fabric Bag Using Heat N Bond: A Tutorial

adorable little stuffed monsters made from your keepsakes (baby blanket, first onesie, etc.) $30 on Etsy.... but it looks easy enough to try it at home too.  So fun!

Tips for using quilt fabric scraps. What a cute idea for using up scraps.

Cut letters from text fabric to spell ‘off you sew’, then glue and stitch into place using cream thread.

Rag Quilt Letters Tutorial by ohsohappytogether. Includes templates for the letters and numbers. Great way to use scraps!

Fabric Scrap Project - Craft these hand dyed tags to use up your fabric scraps.  http://mel-designs.typepad.com/my-blog/2012/08/things-to-do-with-fabric-scraps-part-three-.html#

Have some extra fabric laying around? Put it to good use with these crafty fabric ideas.

Little houses on pillow cases. A great way to use fabric scraps.                                     Gloucestershire Resource Centre http://www.grcltd.org/scrapstore/: