

Today is about embellishing the basic tassel we made yesterday. You can use any manner of items to embellish your tassel. I've used ribbon, slivers of cut fabric, beads, cording and charms. Search through your embellishments for unusual items. Attaching the embellishments will be easy once you learn the basics.
 To add your embellishments you will need a needle, thread (either match the color of the tassel or use clear nylon thread) and a thimble or small needle nose pliers.
Let's begin by discussing the parts of the tassel which, I should add, are of my own terminology. The very top string is the hanger. It holds all the threads together to form the head so that you can fold and tie on the horizontal thread, or waist. The loose threads at the bottom are the drop.

The easiest embellishments to add are the longer ones, such as ribbon, cording, etc. In the tassel at right, I added the ribbon when making the basic tassel by simply laying the ribbon down first, then adding the thread. When I folded the tassel to tie on the waist, I made sure to fold with the ribbon on top.
To add ribbon after the basic tassel is made, measure the drop and double the number. This is the length you'll need to cut the ribbon. Find the center of the ribbon and finger press. Open the ribbon and tie it on with the fold at the waist. Fold the ribbon down and wrap the thread around it so that it covers the fold and holds the ribbon down. And there you are!
Now let's add a few beads. Thread your needle with about 18 inches of thread and knot both ends so that the thread will be doubled. Slip the needle into the tassel from the bottom of the waist inside the threads of the drop so that the knots are buried. The needle should come out of the tassel through the waist.
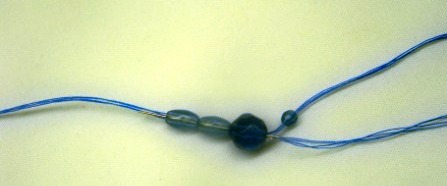 Load some beads onto the needle and slide them along the thread close to the tassel. Now add one small bead and slip the needle back through the first set of beads and pull through. The beads need to touch the tassel waist but do not pull too tightly or they will stick straight out rather than hang down along the drop of the tassel. Make a small knot at the base of the beads.
You can add as many strings of beads as you want by simply running the needle through the waist to where you want the next string and repeat the process.
In the picture below, I added short strands of fat beads between long strands of slim beads. In the black and white tassel, I mixed thread of both colors then added striped beads to the sides and inside the tassel so that they just barely show below the drop.
 Have fun making and embellishing your tassels.
 Send photos of your finished to tassels to mary.marcotte@gmail.com, and I'll post them on my blog. It will be fun to see what you come up with and the rest of us will find inspiration in your work!
Please leave comments letting me know how you like this tutorial or if there are parts that are confusing!

Thanks for visiting!
Happy Quilting,
Mary
1 comment:
I've subscribed again--now maybe your blog will start showing up again in my Google Reader!
Thanks for the tassel tute!
Post a Comment